
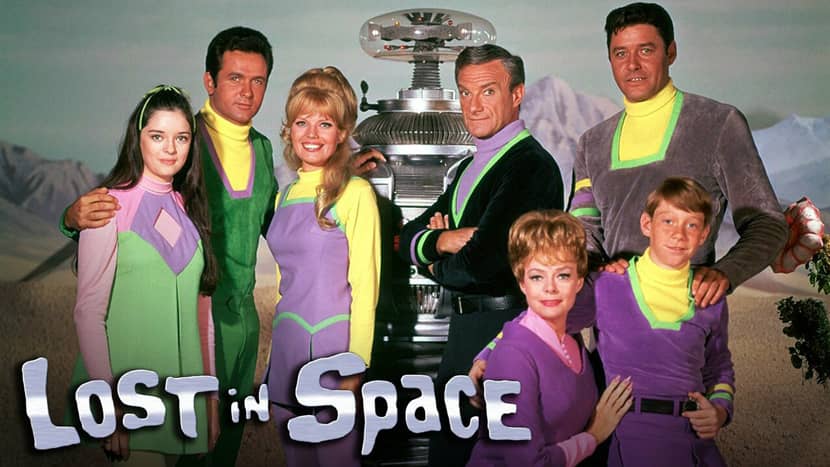
An inspired project by the classic sci-fi TV series "Lost In Space" from 1965, made by Luiz Fernando, a Brazilian architect and 3D artist. This is a making-of article you shouldn't avoid reading as you can collect many modeling and composition tips that help you transform an enjoyable moment of watching TV into a personal project for your portfolio. Enjoy the article!
About Me.
Hello everyone!
My name is Luiz Fernando, I’m an architect and ambitious 3D Artist from Rio de Janeiro, Brazil. Since my university years, I’ve always been passionate about architectural visualization, and the ability to create or recreate sceneries in the tridimensional realm.

Software & Assets Used.
For this project, the software used was 3ds Max, Corona Renderer, Sketchup Pro, Quixel Bridge, and Adobe Photoshop for post-production. The main asset – the vehicle itself – was obtained from the 3D Warehouse library. The scenery elements are a collection of models from Quixel Megascans, 3DSky, Sketchfab, 3D Warehouse, Chaos Cosmos libraries, and some custom-made models by myself.
About The Project.
This particular project began after watching this classic sci-fi TV series from 1965 with my parents a few months ago. When it first aired, Lost In Space was a major success, in an era of incredible technological advances, and when mankind was aiming for higher heights: space travel and exploration.
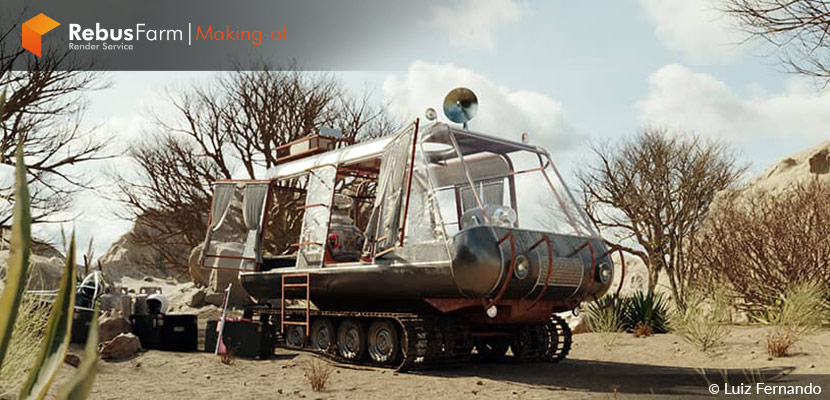
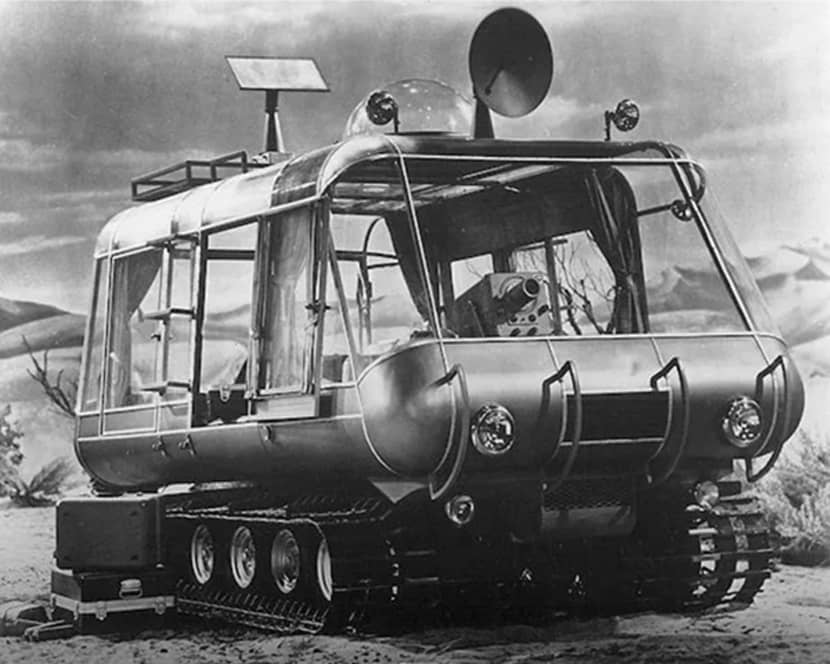
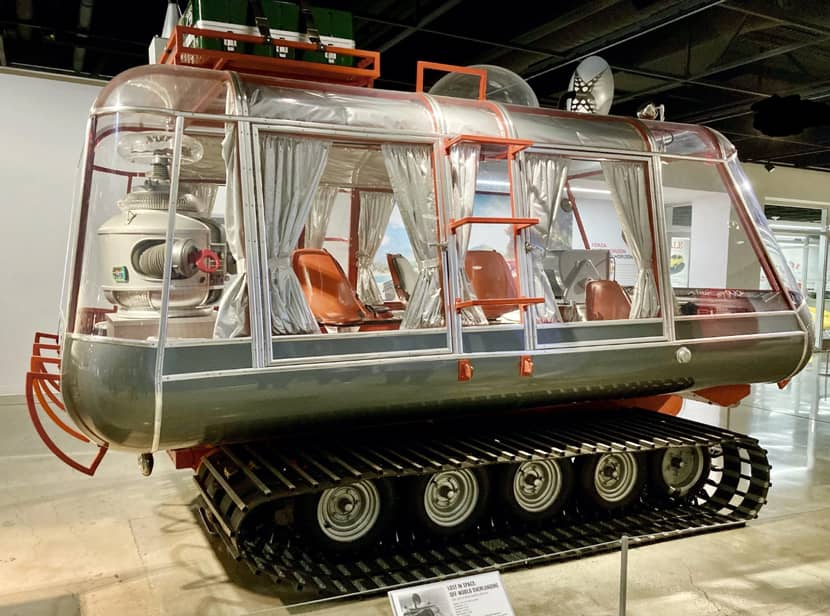
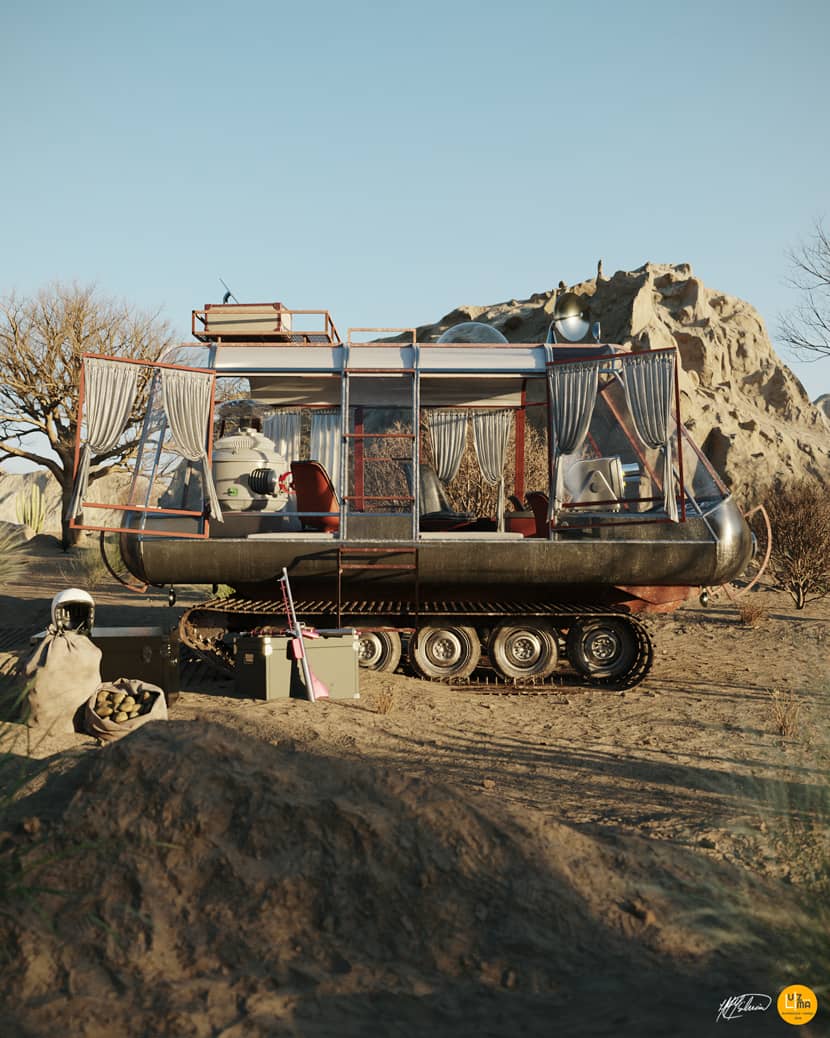
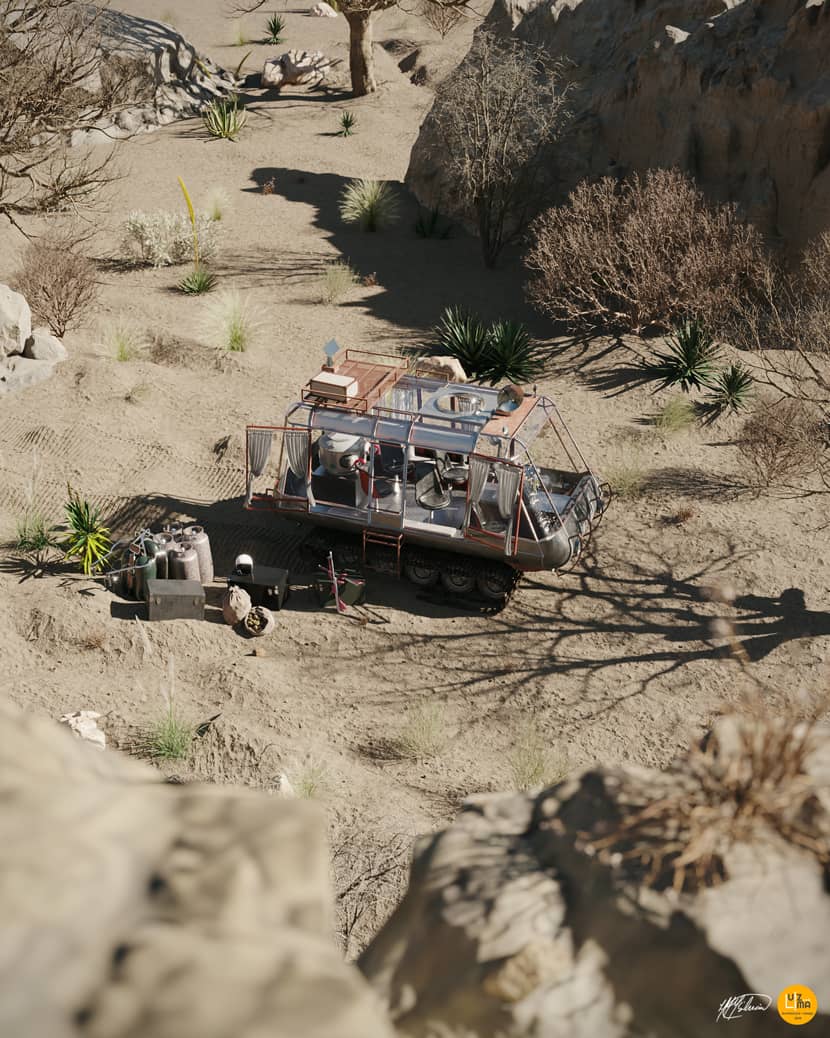
The vehicle recreated here is an ATV called ‘The Chariot’, used by the Robinsons, a hand-picked family trained and turned into a crew of cosmonauts, on a mission towards the human colonization of Alpha Centauri. An undercover spy/doctor and an advanced robot, the B-9, whose famous warning “DANGER! DANGER!” became one of the most recurring lines of the show, completed the entourage. The Chariot served the purpose of traversing all kinds of alien landscapes, either on land or water, hauling the Robinsons and their cargo back and forth from their saucer-like spaceship, the Jupiter 2.

Modeling & Composition.
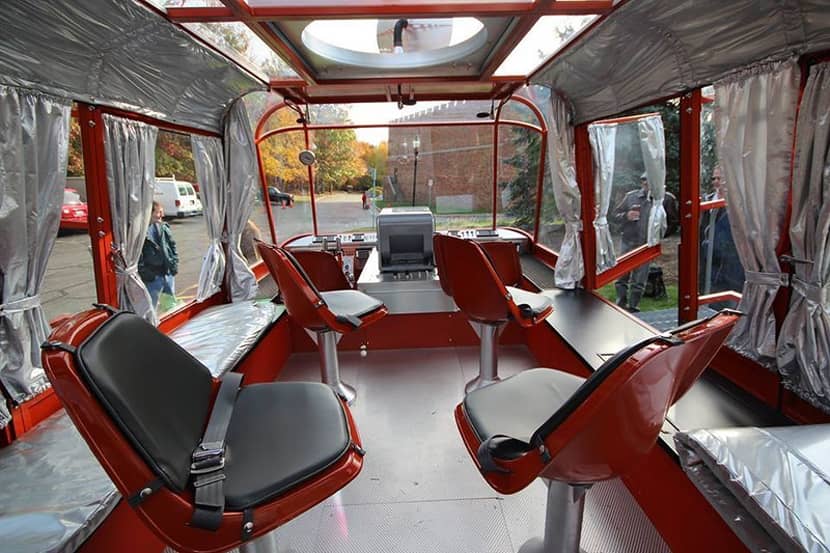
With a huge community of fans up to this day, it wasn’t hard to find all the references I needed to create a scene inspired by the original series. So I went looking for stills from the TV show, scale models of the Chariot, and even photos of the real thing: A full-sized, functional replica was built and is stored at an automotive museum in California!
The base model was found on the 3D Warehouse library, very well modeled and made available by user Smacks999. So I imported it into 3Ds Max and began editing it to better depict the level of details I’d be happier with. This included changing the wheels for more detailed models, and some other minor modeling adjustments to better suit my needs.
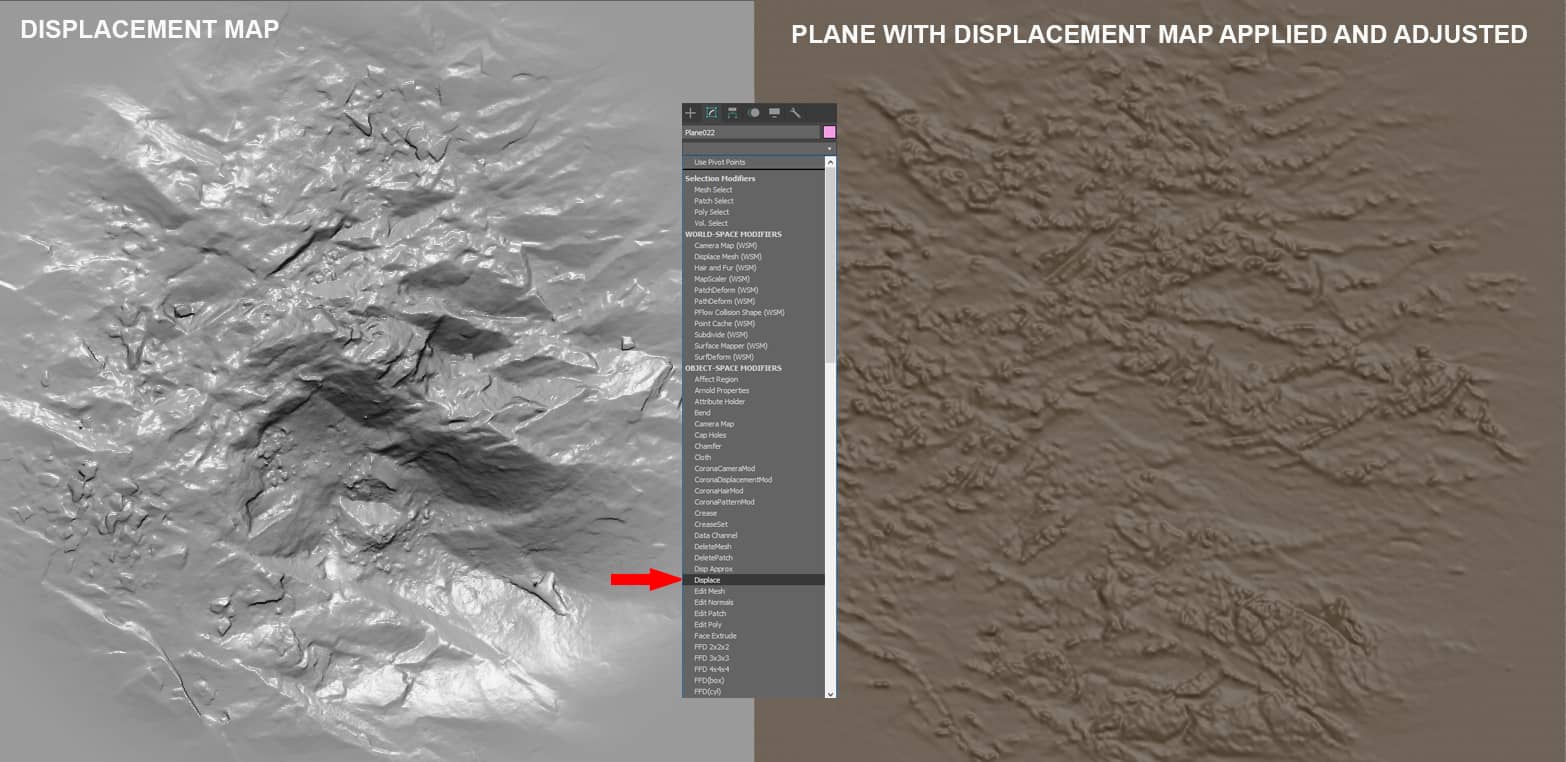
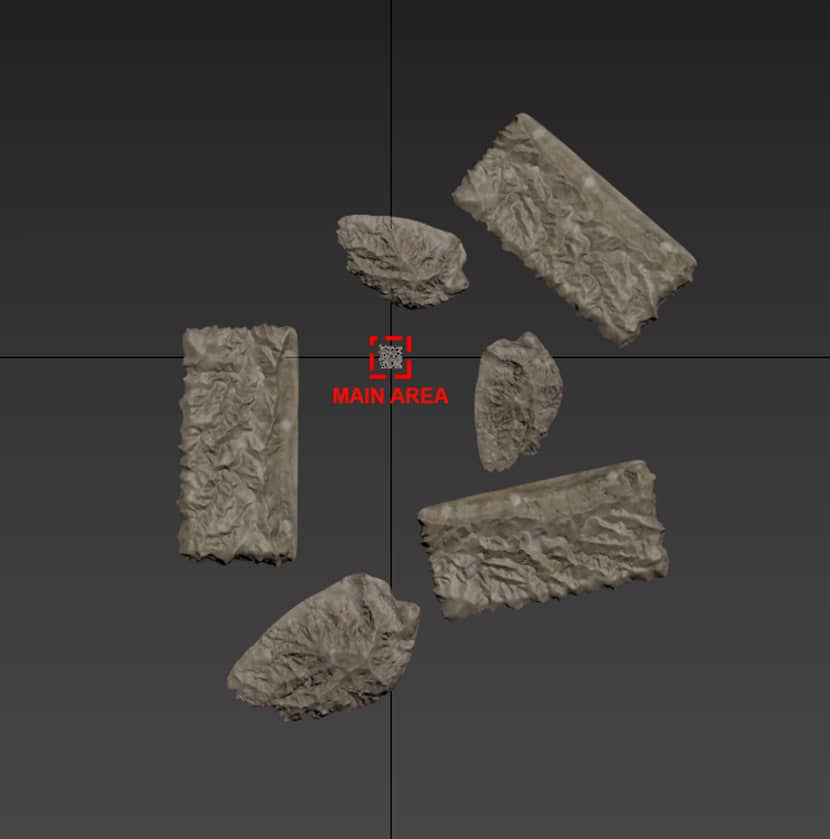
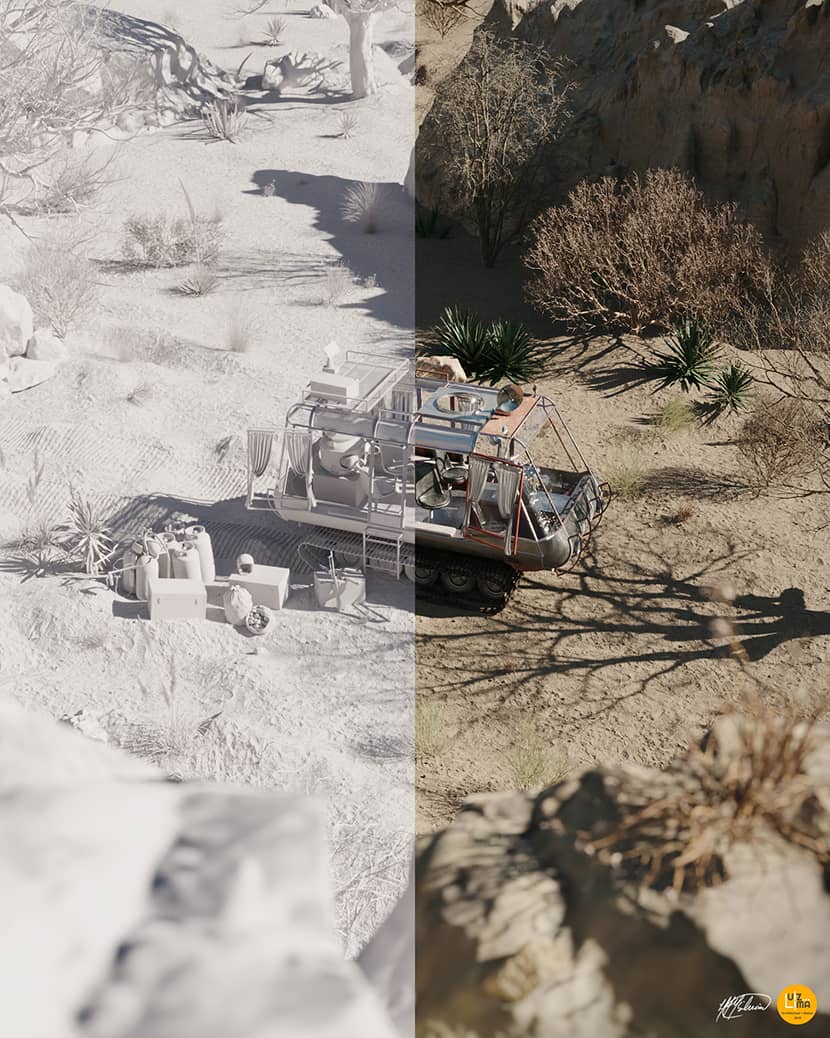
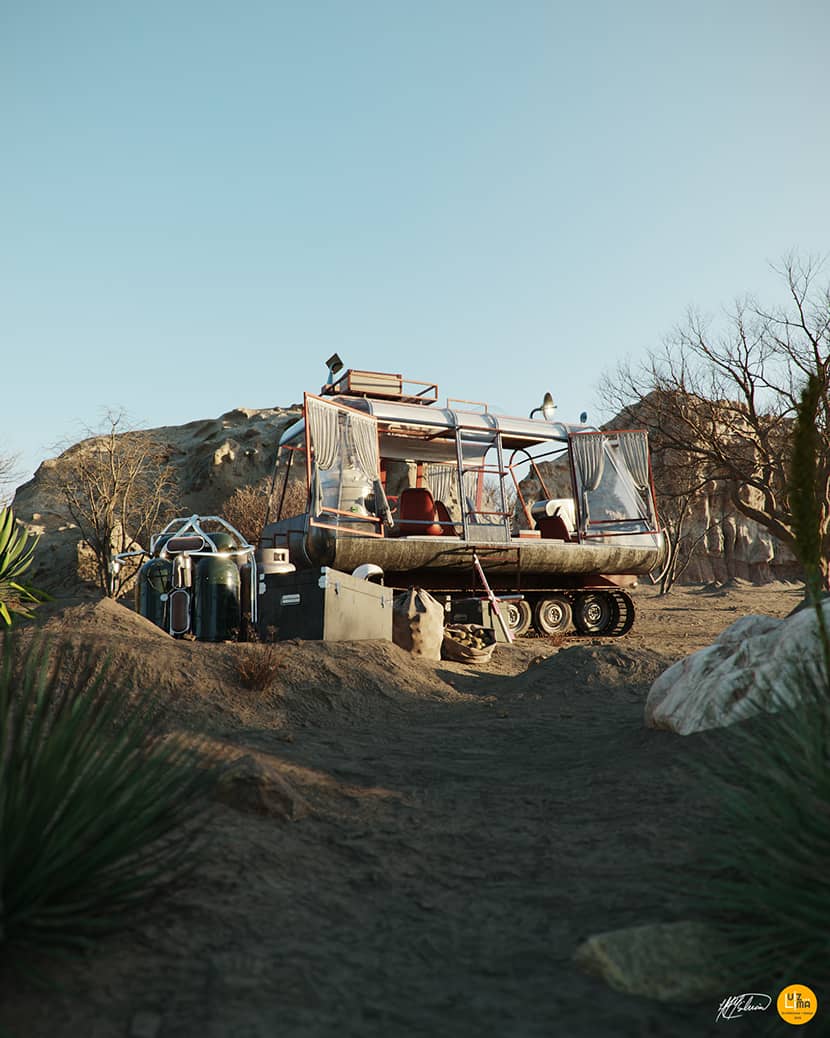
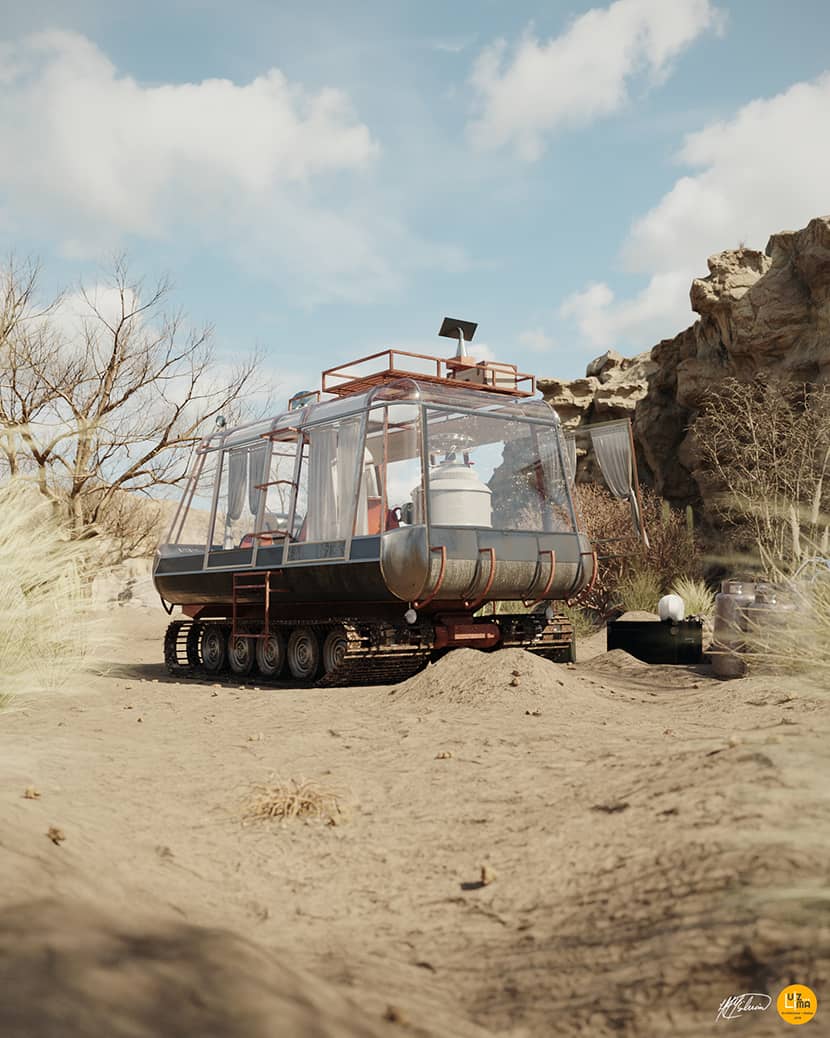
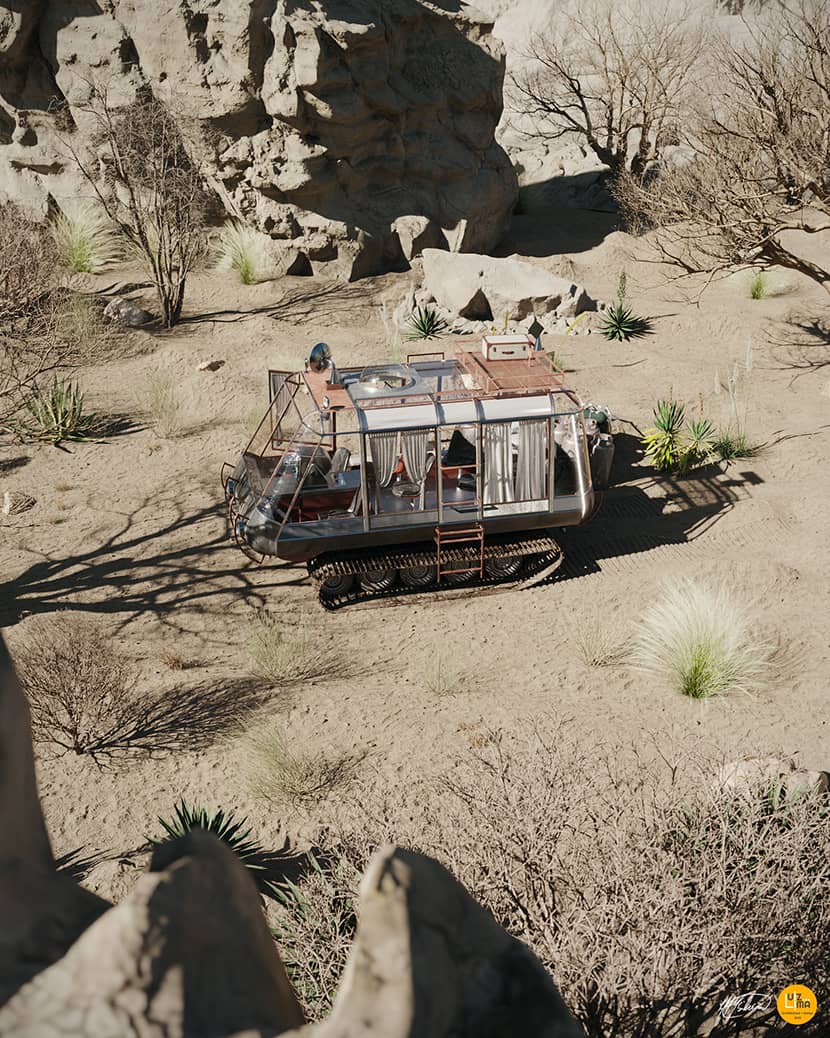
For the landscape, I went with an arid atmosphere, which is the most common planetary environment depicted on the show. To do so, I’ve used a displacement map applied to a rather big plane, allowing for better modeling of surface imperfections, and thus making it easier to position my camera angles and avoid needing to fill eventual gaps on the horizon if the surface area was made smaller.
 Click on the image to enlarge it.>/em>
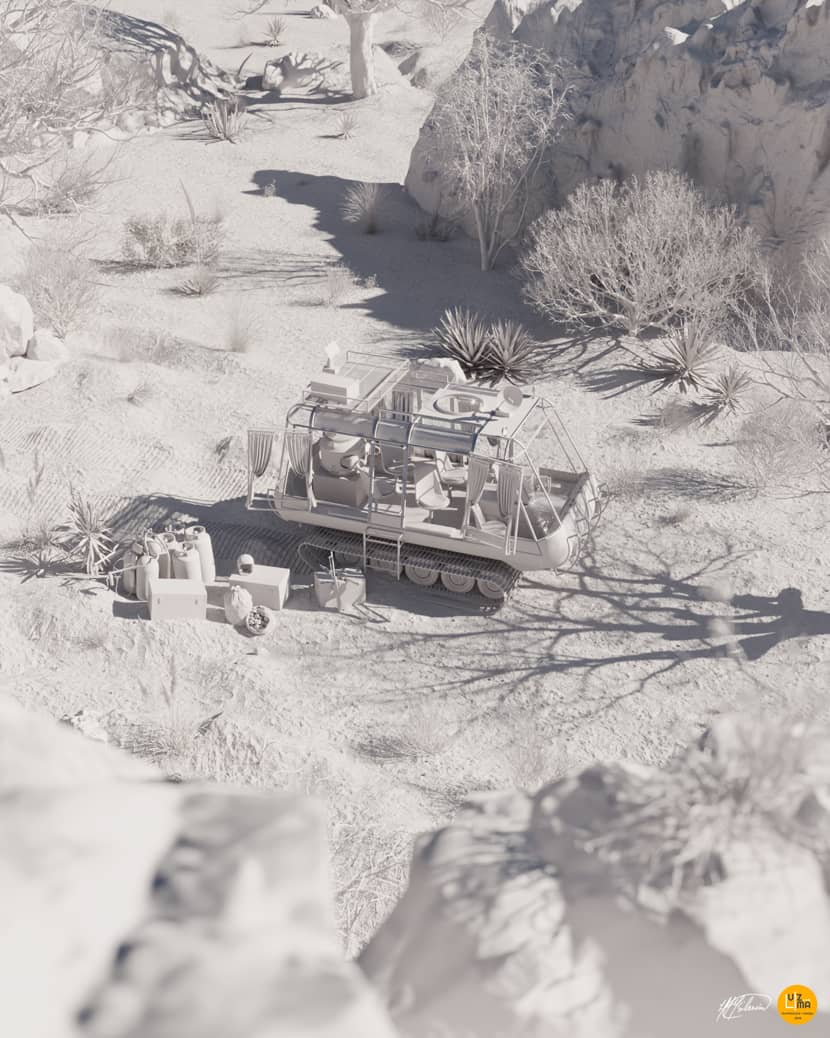
The surrounding mountains and hills are ready-to-use assets from Quixel Megascans, and due to their considerable original scale, they were scattered by hand around the main scenery area, enhancing the idea of perspective and viewing distance of the entire scene.
Vegetation is a mix of Chaos Cosmos assets and models from my personal libraries, and all entities were carefully hand-placed to compose and populate desired camera angles. Loose medium-sized rocks are also from Megascans and were also placed one by one to compose every single one of the cameras’ particular fields of view.
The smaller rocks spread all over the floor were modeled, scaled, and distributed using the Corona Scatter tool.
The subtle vehicle’s tread marks on the sand were hand-drawn on 3D Max using slice plane, extrude, and chamfer tools.
To complete the scene setting, in order to depict the vehicle parked and being unloaded, smaller objects obtained from 3D Warehouse and Quixel Megascans were placed around it to give the idea of human interaction with the vehicle, despite their physical absence.
Texturing.
The texture maps used are a mix of Corona libraries’ samples, and some custom-made ones – the dirty metal sheets on the vehicle’s body, the glass panels, the tread surfaces, and the dirt on the wheels, for example. To create the dirty effect, I used a smudge bitmap on the reflection glossiness node and controlled the overall desired effect and colors using the Corona Color Correct modifier.
The sand texture is from Quixel Megascans and was scaled and colored to best emulate the desert floor and to match the texture of the surrounding rocks.
Lighting.
Scene lighting was achieved using three different 16K HDRI maps from Poly Haven, with some subtle tweaking to achieve the desired visual effects. After render completion of each scene, I chose the best-looking HDRI result to further enhance the image, and to go with the best possible match for each camera angle.
Framing.
The idea was to emulate POV angles from someone walking around the vehicle, and seeing it from higher ground. Depth of field was used with some of the camera angles, in order to increase overall realism and immersion.
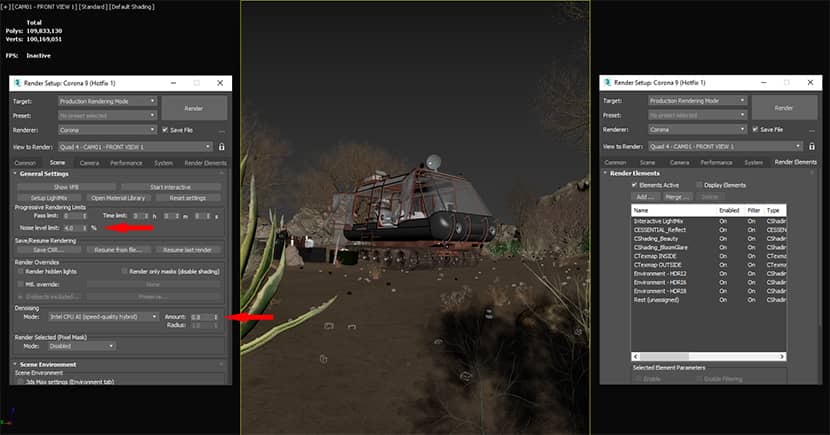
Render Settings.
I constantly play around with LUT settings on the VFB screen, making it easy for me to have better base images to work with when I move to Photoshop. Most of the time, I go with Kim_Amland_Photographic variations, which usually provide me with the best blend of bloom, color balance, and overall realism, especially for exterior scenes.
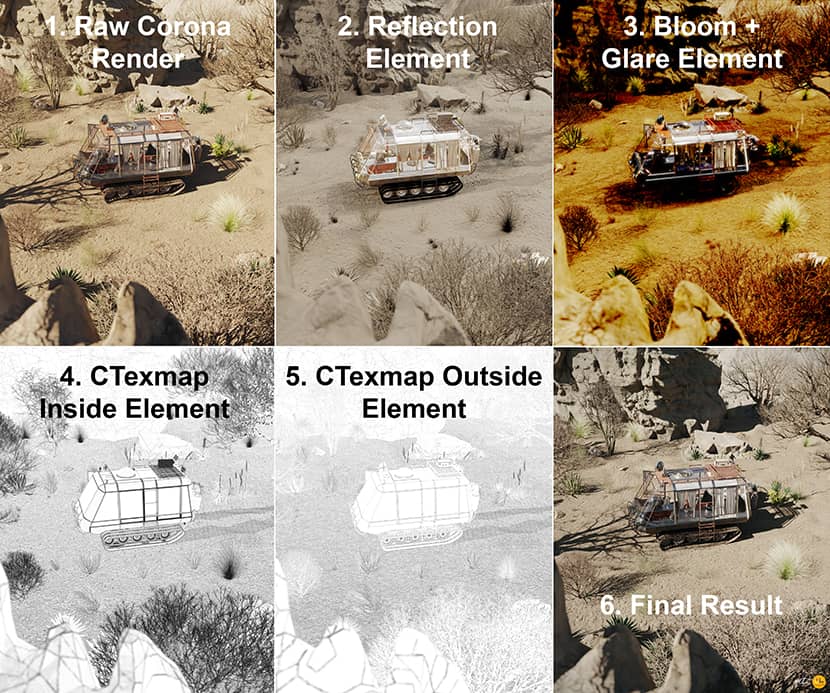
For this job, I have set the Noise Level Limit in Corona to 4%, using Intel CPU AI Denoiser set to 0.8. Image Filter at the “System” tab was set to Tent, with a Width [px] value of 2.0. Render elements selected were two CTexmaps with Corona AO, one for the inside and another for the outside lines, in order to better control edge visualization upon post-production, CEssential Reflection, CShading Beauty, and CShading Bloom + Glare.
 Click on the image to enlarge it.
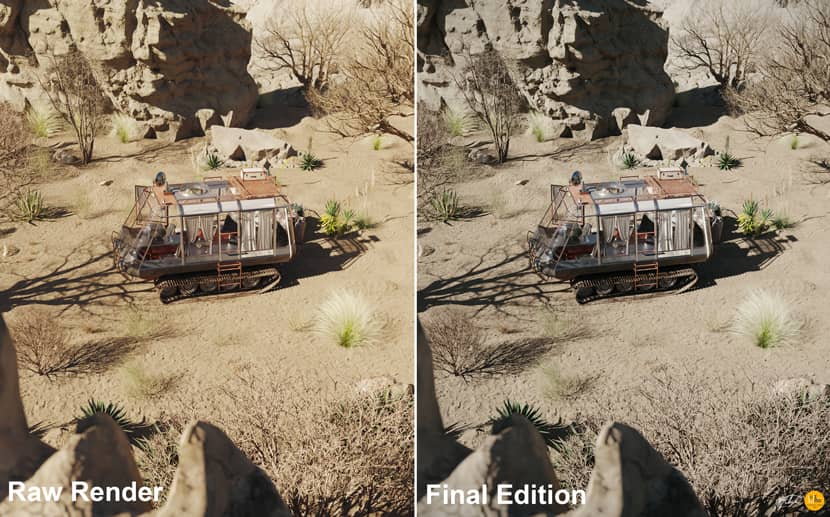
Post-Production.
Post-production was done in Adobe Photoshop, blending the selected render elements with the final rendered image for each camera. After identifying and solving some eventual minor scene mistakes using a healing brush and other correction tools, adjustment layers such as contrast, color correction, levels, and hue/saturation, were applied and set up in order to produce the desired visual effect.
A sharpness filter was then applied to enhance the details and to reduce the overall washed-out effect that sometimes comes out of the renderer. For the final touches, a lens correction filter, and some chromatic aberration to increase realism. And that’s pretty much it! There lies The Chariot, dirty and sun-soaked, after a long stretch through the arid landscape of this alien planet, being unloaded for the Robinsons to set up camp for the night.
Final Images.
Acknowledgments.
I take the opportunity to thank VWArtclub and Rebusfarm for this amazing opportunity to present my work on such prestigious platforms, it really means a lot to the artists. And would also like to thank my 3D mentor Ander Alencar, founder of Oficina3D Academy, and all of his team for their endless effort in creating an innovative and constantly up-to-date learning experience.
Kind regards,
Luiz Fernando.

About the artist
Luiz Fernando is an architect and ambitious 3D Artist from Rio de Janeiro, Brazil. Since his university years, he's always been passionate about architectural visualization, and the ability to create or recreate sceneries in the tridimensional realm.
![]()
![]()
![]()
![]()