
Perlin Noise was a major breakthrough in procedural generation and computer graphics, developed by Ken Perlin to make computer-generated imagery look less “machine-like” and more natural.
Perlin noise made it possible to generate smooth, natural-looking variations that mimic patterns found in the real world. It is now widely used to create terrain, clouds, textures, landscapes, and other elements that are meant to look organic rather than artificially generated.
It is the predecessor of Simplex Noise, which Ken Perlin introduced in 2001 and which leaves fewer directional artifacts (unwanted patterns), especially in higher dimensions.
What Is Perlin Noise?
Perlin Noise is a type of gradient noise used for many applications in computer graphics. Generally, it is used to simulate textures with patterns of “structured randomness,” unlike white noise, which is completely random. Think of things like the soft, irregular shapes of clouds, the contours of mountain ranges in the background, or the uneven density of fog at dawn.
Ken Perlin developed it after the making of Tron (1982) and was awarded an Academy Award for Technical Achievement for his contribution.
If we look at CGI that predates Perlin Noise, we can see that early CGI was indeed mechanical-looking, and this meant that it looked unnaturally smooth, repetitive, or uniform, making it difficult to convincingly recreate the irregular patterns found in nature. In short, it was not realistic.
The reason why Perlin Noise and other types of gradient noise make CGI more realistic is that they mimic how nature creates seemingly perfect forms that, upon closer observation, are rarely uniform. Instead, they are made up of gradual, interconnected variations that make them look natural.
Perlin Noise is widely used in different applications in 1D, 2D, 3D, 4D, and higher dimensions.
How Does the Perlin Noise Algorithm Work?
The Perlin Noise algorithm is a straightforward system that works with a few variables that equal different values depending on where they are located within a space, and in this case, this space is represented by a grid. These values are then combined to create gradual changes instead of completely random ones.
For example, when used to generate a mountain range, the values can determine how high or low the terrain should be at different points, creating a series of connected peaks and valleys rather than randomly placed hills.
Gradients, Dot Products, and Interpolation
Perlin Noise is a product of the following elements:
a) A grid of pseudo-random gradient vectors
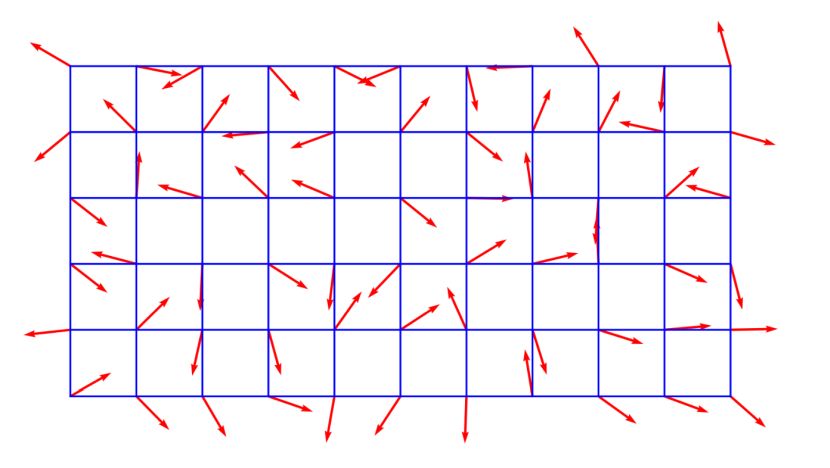 Image source: Wikipedia
b) The position of an input point inside a grid cell in x,y coordinates
c) Dot products are used to calculate each gradient’s contribution
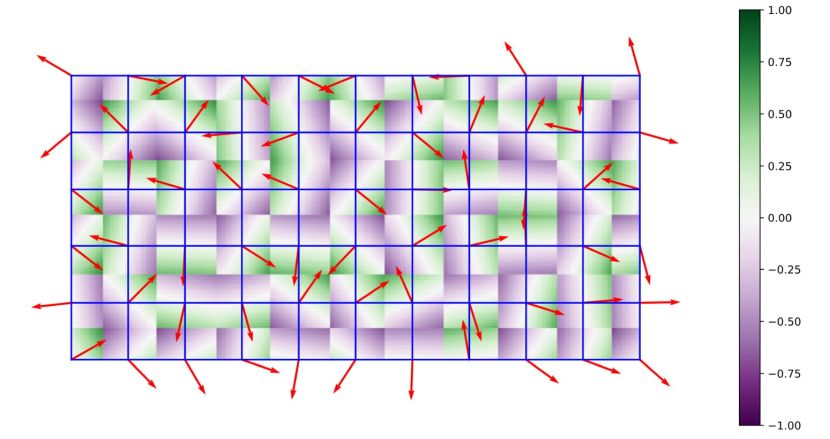 Image source: Wikipedia
Note: the dot product shows whether a nearby gradient pushes the value up, down, or leaves it neutral, depending on how closely the gradient's direction lines up with the direction to the input point.
d) Smooth interpolation used to combine the values
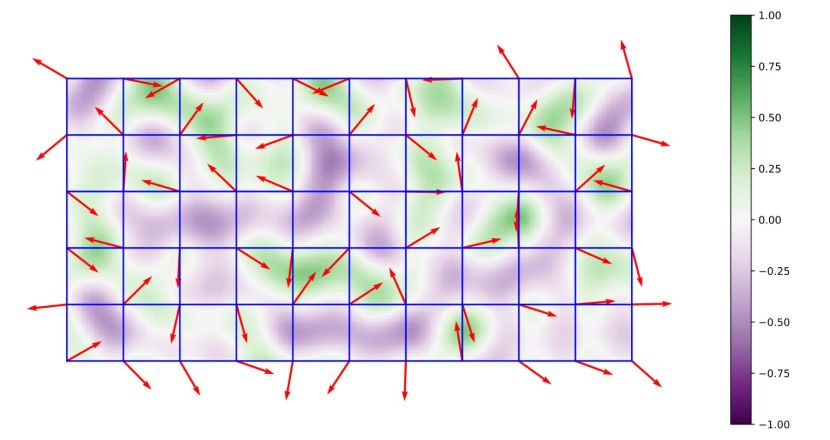 Image source: Wikipedia
Now, here’s how the above elements produce gradual transitions instead of abrupt, random changes.
Imagine yourself (the input point) standing on a giant tiled floor. Each corner of the tiles has a small arrow pointing in a different direction. As you stand at different spots on the floor, the nearby arrows affect you differently. If you stand closer to one corner, its arrow has more influence; as you move toward another corner, the second arrow gradually has more influence.
The algorithm uses these changing influences to decide whether the value at your location should become slightly higher or lower. Because the influence changes gradually as you move, the values also change gradually rather than jumping randomly from one extreme to another. This is what gives Perlin Noise its smooth appearance. Instead of every location getting a completely unrelated random value, each location is connected to the locations around it.
Basic Steps of a Perlin Noise Implementation
Now that you know the variables involved in generating Perlin Noise and how its concept works, here’s how its implementation is carried out:
- Assign gradients at grid intersections - each intersection is given a pseudo-random direction, often represented by an arrow. The different directions are what determine how the algorithm produces variation.
- Identify the grid cell containing the input point - the algorithm is given an x and y location, and it locates it within the grid.
- Calculate the offset vectors - the distance of the input point from the four corners is measured, and how their directions are relative to its position.
- Calculate the dot products for the surrounding gradients - the dot product is simply measuring how well the corner's direction lines up with the point's position. The dot product is zero when the input point is exactly on a corner. After this step, you’ll have 4 values.
- Interpolate the resulting values - the algorithm blends the four dot products together, generating 1 value through interpolation.
- Return and scale the final result - the value can then be scaled or adjusted depending on what it is being used for, such as controlling terrain height, cloud patterns, or surface textures.
Repeatability and Performance
Perlin Noise, while random, needs a structured way to work. It still needs to be predictable, at least to the person implementing the noise. This makes it repeatable, and patterns being repeatable is very important in some applications.
The way the algorithm works allows the same pattern to be reproduced whenever the same coordinates and settings are used. Instead of choosing completely new random directions each time, it uses a consistent method to determine the direction associated with each grid point. Implementations can use hashing or a permutation table for this purpose.
These methods help the algorithm consistently assign the same gradient direction to a particular grid point. This means that a particular location will always receive the same values and influences, producing the same noise pattern when the process is repeated, or a deterministic result.
In addition, this also reduces repeated calculations. Imagine you’re building a 1000x1000 terrain and you need to determine the varying heights of the terrain at 1,000,000 different points. These points often share the same grid corners; since a grid point's gradient direction does not change, implementations can store it and reuse it for other nearby locations instead of determining it again.
Higher-dimensional implementations need more calculations because each grid cell has more corners to evaluate: four in 2D, eight in 3D, and sixteen in 4D.
How Is Perlin Noise Used in Procedural Generation?
The main purpose of Perlin Noise in procedural generation is to automate the creation of textures or environmental features so that creators no longer need to manually model or create them.
Here are some of the main applications of Perlin Noise:
- Terrain, hills, plains, valleys, and mountain ranges
- Game environments, caves, dungeons, and biomes
- Clouds, weather patterns, waves, water, smoke, and fire
- Wood, stone, grass, and other natural-looking patterns
- Animated effects and organic movement
- Scientific and data visualization
- Generative art and creative coding
To give you an example, games like Minecraft and Terraria use Perlin Noise to generate their terrains and “worlds.” In Minecraft, players can generate unique worlds with different combinations of mountains, plains, valleys, caves, oceans, and other environmental features.
With more complex applications, several noise layers are usually used with different frequencies and amplitudes. In some situations, additional procedural rules are introduced, and Perlin Noise is combined with other noise types.
This mainly increases visual variety in textures and environmental features, reducing or even eliminating repetitive manual asset creation.
How Are Perlin Noise Textures Created?
Raw Perlin Noise values are often adjusted and combined to create more detailed and natural-looking procedural textures. Creators increase or decrease their frequencies and amplitudes to control the size and strength of its variations. This effectively changes how a texture looks. For example, on a stone texture, this changes the size of bumps, cracks, and other irregularities.
The same noise functions may also be evaluated within shaders or material systems to generate or modify these variations during rendering, without requiring every detail to be created manually.
Adjusting Frequency, Amplitude, and Octaves
Frequency, amplitude, and octaves control a texture or environmental feature’s scale, strength (of variation/changes), and layers, respectively. Frequency controls the scale of the visible features.
Lower frequencies produce larger, more gradual changes, while higher frequencies create smaller and more frequent details. Amplitude controls the strength of those changes, determining how subtle or pronounced the variation appears. Octaves are multiple layers of noise combined together, allowing a texture to have both broad forms and finer details at the same time.
Layering Noise for More Complex Textures
There are some textures and features that need more than a single Perlin Noise to capture realism. Wood grain, for example, in the real world contains variations at multiple scales. It needs both broad directional patterns and finer variations to look convincing.
The same goes for clouds, grass, rocky surfaces, animated fire, and more. In these cases, layering noise and even combining it with Simplex Noise or with cellular noise types such as Worley Noise and Voronoi Noise is necessary for realism.
What Causes Perlin Noise Artifacts?
Visible artifacts are patterns and distortions that aren't meant to be there, caused by limitations in the underlying grid, interpolation, sampling, or unsuitable noise settings. Instead of appearing naturally random and continuous, the noise can reveal the structure used to generate it.
Here are some common causes of visible artifacts:
- Directional patterns - this is when the underlying grid becomes too noticeable. Adjusting the interpolation method or switching to Simplex Noise can reduce this.
- Visible repetition - classic implementations repeat after a fixed number of grid cells (often 256), so the pattern becomes noticeable over large areas. Offsetting or rotating individual noise layers can reduce this.
- Uniform-looking features - when some generated areas appear similar, this is because there’s not enough variation. Adding octaves or combining Perlin Noise with another noise type introduces more irregularities.
- Excessive high-frequency detail - a texture could become too populated with patterns when there are too many octaves. Reduce the number of noise layers or make the finer layers less strong to keep the texture looking natural.
Simplex vs. Perlin Noise: What Is the Difference?
Simplex Noise was created as an alternative to Perlin Noise to address some limitations of classic Perlin Noise, such as grid-related artifacts and computational scaling in higher dimensions.
Here’s an overview of the similarities and differences of the two:
| Feature | Perlin Noise | Simplex Noise |
|---|---|---|
| Underlying structure | Regular grid | Triangular grid |
| Visual artifacts | More directional artifacts | Less directional artifacts |
| Computational requirements | Efficient in lower dimensions | More efficient in higher dimensions |
| Pattern quality | Smooth, natural variation | Smoother, less directional variation |
| Typical applications | Terrain, textures | Animation, volumetric effects |
Perlin Noise remains a practical choice for traditional terrain and procedural textures, especially in 2D and 3D.
Simplex Noise may be preferable for higher-dimensional or animated textures, volumetric effects, fluid simulations, and some real-time applications. Neither is universally better; the choice depends on the specific use case and implementation.
Tips for Better Noise-Based Results
To get the best results when using Perlin, Simplex, or other types of noise for texturing, animations, modeling, or other applications, here are a few practical recommendations:
- Establish the main scale before adding fine detail
- Balance frequency and amplitude
- Add octaves gradually
- Combine broad and fine noise layers
- Mix different noise types when one pattern looks too uniform
- Check the result for visible grids, aliasing, and repetition
FAQ
Can Artists Use Perlin Noise Without Writing Code?
Yes. Artists can use design software that has procedural noise controls that do not require programming.
Can Perlin Noise Be Baked Into a Regular Image Texture?
Yes. Perlin Noise can be baked into a regular image texture and used like any other texture.
Can Perlin Noise Be Made Seamlessly Tileable?
Yes. With matching values at opposite edges, you can make Perlin Noise seamlessly tileable.
Can Perlin Noise Create a Seamless Looping Animation?
Yes. Perlin Noise can be animated by varying its input coordinates over time. By designing the start and end states to match, the noise can produce a seamless loop without a visible jump.
What Is OpenSimplex Noise?
OpenSimplex Noise is an alternative to Simplex Noise, created by Kurt Spencer. They both produce smoother noise with fewer directional artifacts than Perlin Noise. However, OpenSimplex Noise uses a different algorithm.

About the author
Nicole Holt is an experienced 3D enthusiast with a career in marketing and content writing. Thanks to this unique combination, she is able to showcase the technical intricacies of 3D art and rendering while also making the subject accessible to a wide audience. When she's not immersed in the digital world, Nicole can be found in the great outdoors, most likely with her beloved dog, Sammy.