

Transforming light, material, and spatial balance into vivid storytelling is the hallmark of exceptional architectural visualization. In this making-of feature, seasoned visualization artist Paria Sadeghi of S2ArchViz invites us behind the scenes of Villa Licht 11, a refined residential project where design clarity meets atmospheric nuance. From thoughtful references and modeling precision to layered lighting moods and advanced vegetation techniques, Paria shares her artistic journey and technical approach in building a project that exudes tranquility, realism, and visual harmony!
About me.
Hello 3d community,
I’m Paria Sadeghi, an architect and visualization artist with over a decade of experience and a Master’s degree in architecture. My journey into ArchViz began during my years as an architect, where I developed a deep passion for translating design concepts into immersive 3D visuals.
A few years later, with my background in architecture and visualization, my partner and I founded S2ArchViz. Since then, I’ve had the opportunity to collaborate with architecture studios, designers, and clients worldwide on many exciting projects.
Today, I’m excited to share the making-of article for Villa Licht 11. I hope this behind-the-scenes breakdown will be valuable to anyone interested in architectural visualization.

About The Project.
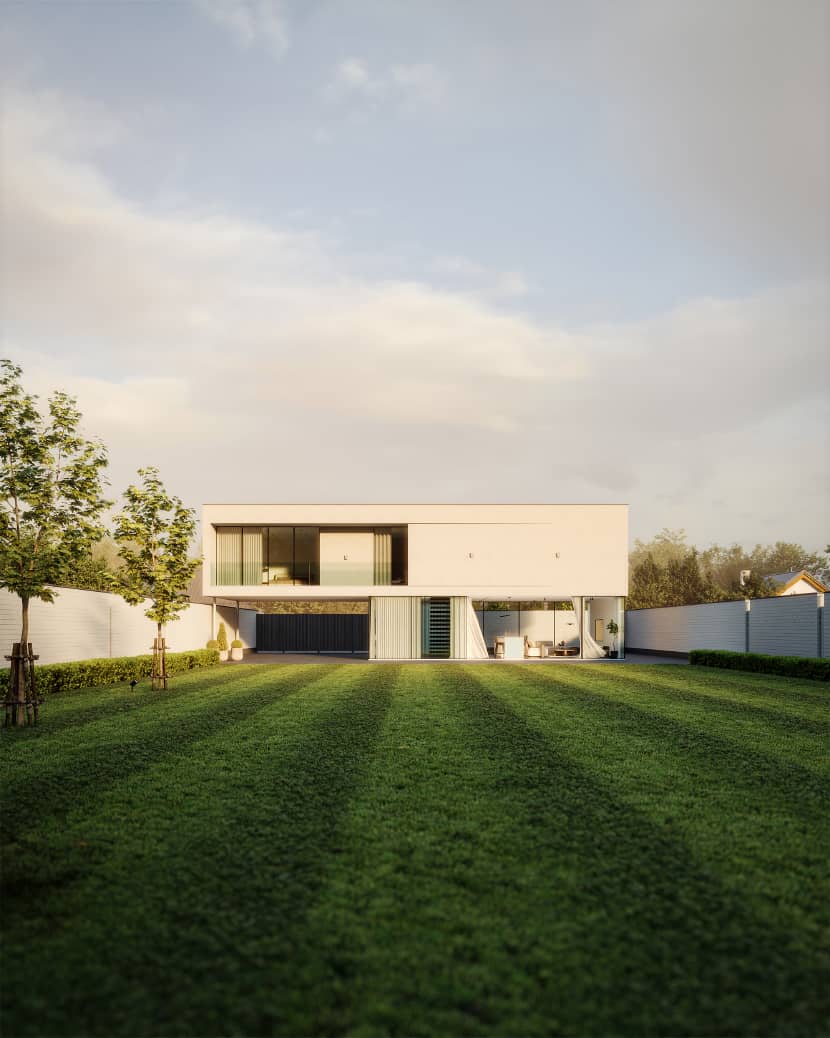
Villa Licht 11 is a project where we handled both architectural design and high-end visualization at S2ArchViz to bring the concept to life. As the lead 3D artist, my goal was to capture the dynamic interplay of natural light and shadows, refined material textures, and the seamless connection between indoor and outdoor spaces, while preserving the architectural tranquility.
Our client wanted to showcase different aspects of the project, each telling a unique story. To achieve this, we explored multiple moods, revealing new perspectives on the villa’s character and atmosphere.

Software used.
My workflow has evolved with time. Once a devoted V-Ray user, I now primarily rely on Corona Renderer for its intuitive handling and photorealistic output. For this project, I used:
- 3ds Max – modeling
- Corona Renderer – rendering
- Chaos Scatter – vegetation distribution
- Photoshop – post-production
- Additional tools: Quixel Bridge, Substance Painter, Forest Pack, 3DCollective HDRIs.
References.
Gathering proper references is essential for achieving realism in architectural visualization. Before starting a render, selecting references for lighting, materials, vegetation, and ambiance helps define the artistic direction and improve accuracy.|
The project’s location plays a key role in these choices. Factors like natural light behavior, color temperature, seasonal changes, regional vegetation, and architectural styles influence the final image. For example, a Scandinavian setting differs from a Mediterranean one, and understanding these nuances ensures authenticity.
By carefully studying real-world examples, I refined the lighting, textures, and environmental details in Villa Licht 11, creating a compelling and lifelike visualization.
Below are the key references that shaped this project.

3D modeling.
Since Villa Licht 11 follows a minimal and modern design approach, the modeling process was relatively simple. However, attention to detail and proper layer management were essential for a clean and efficient workflow.
Both the design and modeling were carried out by Mohammad Salamatrad, whose meticulous approach always ensures high precision. It is always a pleasure to work on his beautifully crafted designs and expertly executed models.


3D Assets.
Having a professional and well-detailed asset library plays a key role in achieving realism in architectural visualization. High-quality assets add depth, accuracy, and believability to a scene. Some of the must-have asset sources include Maxtree packs for vegetation, Quixel Bridge for debris and surface imperfections, and Megascans, Globe Plants, VizPeople, and Evermotion for a wide range of ready-made 3D models.
However, realism isn’t just about adding more objects. It’s about balance! In my experience, using too many different tree and plant species can lead to visual chaos and an unrealistic outcome. Careful selection and distribution of assets are key to maintaining harmony and authenticity in a scene.
Below are the 3D assets used in Villa Licht 11 to enhance its visual quality.

Composition.
Composition plays a crucial role in creating visually compelling renders. When setting up a scene, I always consider three key factors:
- Composition rule: I use the Image Composition Helper script to ensure a well-balanced frame.
- Aspect ratio: Choosing the right aspect ratio helps emphasize the subject and maintain a strong visual impact.
- Scene structure: Defining the foreground, midground, and background enhances depth and realism..

For a deeper understanding of composition techniques, this video provides great insights:
Lighting.
In my workflow, the lighting process is the most important step. I strongly believe in the words of Le Corbusier, who once said:
"Architecture is the learned game, correct and magnificent, of forms assembled in light." This quote highlights the significance of light in effectively presenting an architectural idea.
To achieve the best result, I experiment with different lighting techniques and HDRIs to find the approach that best conveys the architecture’s form and functionality. For this project, we aimed to create three distinct moods—sunny, sunset, and blue hour. After multiple tests, I finalized these HDRIs, all sourced from 3D Collective HDRI packs.
- Daytime: light: 3DCollective_HDRi_044_1945_+32_16K.hdr
- Sunset: 3DCollective_HDRi_023_1752_+8_16K.hdr
- Background: 3DCollective_HDRi_004D_1744_16K.hdr
- Blue time: 3DCollective_HDRi_112_2008_16K.hdr
- Background:’ 3DCollective_HDRi_112_2008_16K.hdr
I always determine the lighting setup in clay mode, carefully adjusting the sun direction and rotation angle. Additionally, I apply slight refinements using Corona Color Correction to fine-tune the HDRIs.

Materials.
Using high-quality textures is essential for achieving realistic materials in architectural visualization. A 3D artist must closely observe the real world to fully understand the characteristics of different materials before recreating them digitally.
Key material properties such as reflection, glossiness/roughness, bump, displacement, translucency, opacity, anisotropy, and IOR (index of refraction), along with other advanced attributes, should first be studied in real-world scenarios. Once these characteristics are well understood, the next step is to practice and refine their replication in 3D software.
For greenery, achieving realism is just as important. I highly recommend this video, which provides valuable insights into proper vegetation material setup.
Techniques.
One of the most frequent questions I received from my social media audience after publishing this project was about how I created the striped grass in the backyard. So, I’d like to take a moment to share my simple yet effective workflow using Chaos Scatter.
Here are the steps I followed:
- Scattered a set of grass 3D assets onto the grass bed surface in the usual way in proper count.
- Applied another Chaos Scatter element to create the darker stripes using the settings shown in the image.

Post-Production.
At this stage, I take full advantage of render elements to refine the final image. Elements like direct, indirect, reflection, translucency, and CTexmap help enhance details, while masking elements such as Wire Color and Masking ID allow for precise adjustments.
I apply the final touches and refinements in Adobe Photoshop, fine-tuning the colors, contrast, and composition to ensure a polished and visually compelling result. Even in post-production, I continuously compare the outcome with my references, making sure every detail aligns with the intended mood and realism. This step helps maintain consistency and ensures that the final render stays true to the project's vision.
Final images.
Once the final renders are ready, we take an extra step to ensure the best possible outcome. Before delivering them to the client or publishing them, we always seek feedback from our team. This collaborative review process allows us to refine details, enhance realism, and ensure that the final images meet our high standards of quality, accuracy, and visual impact.


Thank you for reading!
Paria Sadeghi.

About the artist
Paria Sadeghi is an architect and visualization artist with over a decade of experience and a Master’s degree in architecture. She co-founded S2ArchViz, working with architects, designers, and brands worldwide. With expertise in rendering, lighting, and composition, she is dedicated to creating visually compelling and realistic architectural visualizations.