
Discover the process behind creating the stunning "Villa In Sotogrande" with insights from Jose Antonio Garcia Zorrilla. Learn about the software, techniques, and tips for achieving photorealistic results, from modeling to post-production. This article provides a detailed look at the workflow and creative decisions involved in architectural visualization, perfect for enthusiasts and professionals alike.
About me.
Hello 3D community,
I am Jose Zorrilla, a senior artist and current manager of the architectural visualization studio ZenitVisuals, which is located in Malaga (Spain). Although I am a civil engineer and have practiced my profession for many years, I dedicated all my free time to what has always been my passion, the 3D world, architectural visualization, photography, etc...
It was in 2014 that I decided to leave my main job and start a new professional path, which led me to my current position within ZenitVisuals.
About the Project.
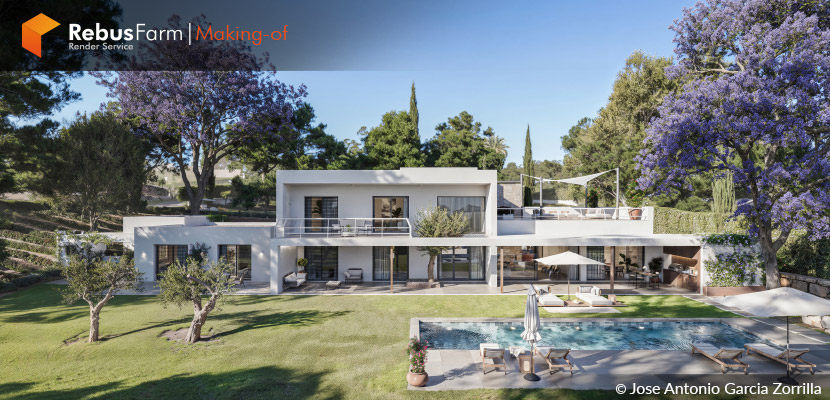
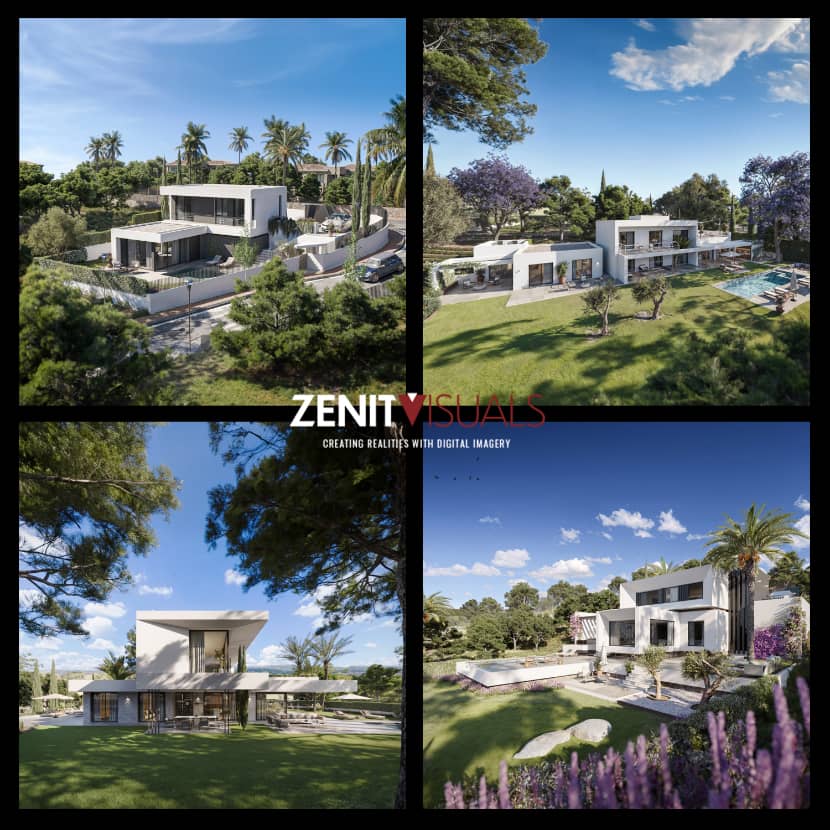
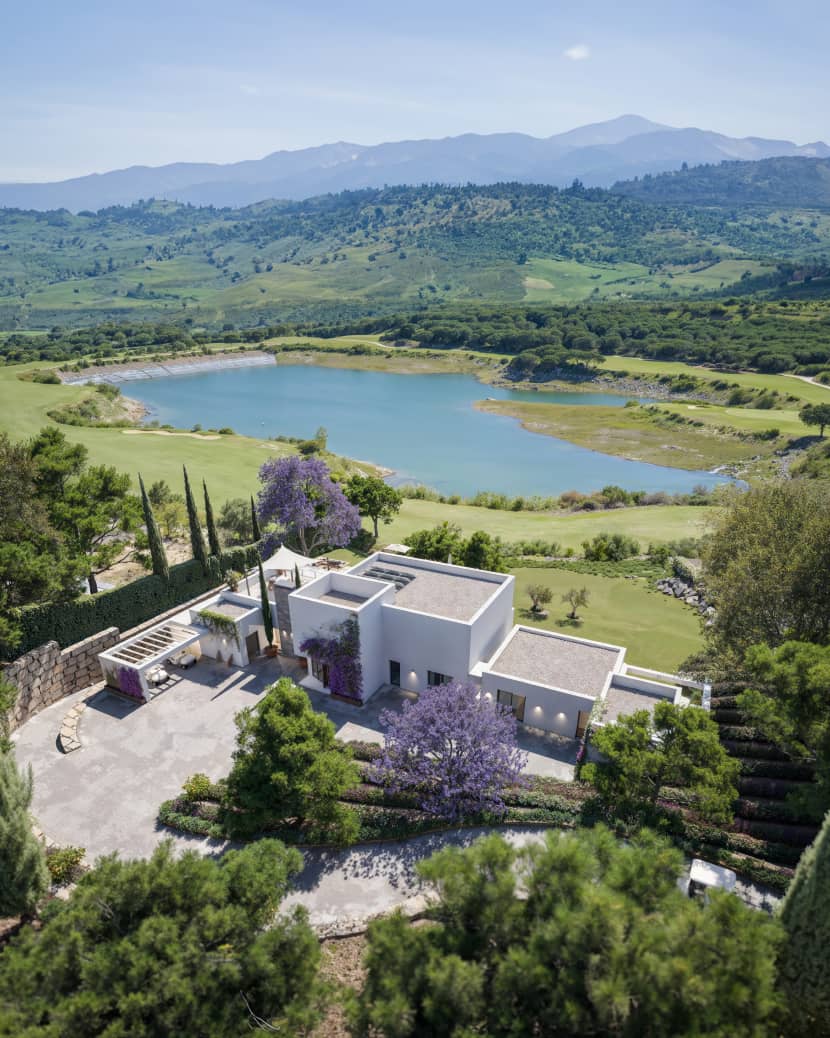
Villa Almenara falls within the typical project defined in the previous section, a super luxury villa located in Sotogrande (Cádiz) next to one of the leading golf courses in Spain. The developers were looking for striking exterior images in which the architecture and plot were defined entirely, highlighting its location and views of the golf course.
Software Used.
For this project, the software used was 3ds Max 2022, Corona Renderer 10, Itoo Forest Pack, Quixel Megascans, and Adobe Photoshop for post-production, plus MagnificAI.
Introduction.
I am going to try to approach this “making of” so that it is as practical as possible for readers and those interested in the subject, providing tips and a workflow that we have designed in the studio and that is very efficient for us, trying to maximize the quality of our deliveries in the shortest time possible.
As I have already mentioned, the studio is located in Malaga. Although we have clients from many areas, our main target is developers and architecture studios with luxury villa projects in coastal areas.
After working on many projects of this type, we have detected some common patterns in these clients that have helped us to undertake the work more quickly without lowering the level of quality:
- The client wants his architecture to appear in practically all the assignment images. Typically, views are made of the front façade, side, and some diagonals; the pool area is of great interest, and the views from the villa towards the sea, the mountains, etc... What I mean is that in these images, the client wants typically that all your architecture appears, and that the more of your project enters an image, the better, causing you to have to play with focal lengths from 18 to 30 mm, which cover a lot of visual field.
- These clients want images with a “summer” look, full sunlight, blue sky, and marked contrasts. It must be taken that our 3D work will be aimed at real estate and marketing agencies and will serve as a basis for selling these promotions, usually to end clients looking for sun, blue sky, and sea.
- The landscaping work is very similar in all cases, with very well-kept lawns with intense greens, Mediterranean/tropical vegetation, pines, olive trees, palm trees, thyme, lavender, etc.
- The materials used are similar in each project, such as white facades, natural stones, wood, concrete, dark metal carpentry, light ceramic flooring, etc.
- These clients (especially real estate developers) look for impressive images and pay more attention to the final look of the image than to its total fidelity to the architecture and projected environments.
- Most of the time, the 3D model is provided to us by the architecture studio, and we do not have to start modeling from CAD plans or PDFs.
Modeling.
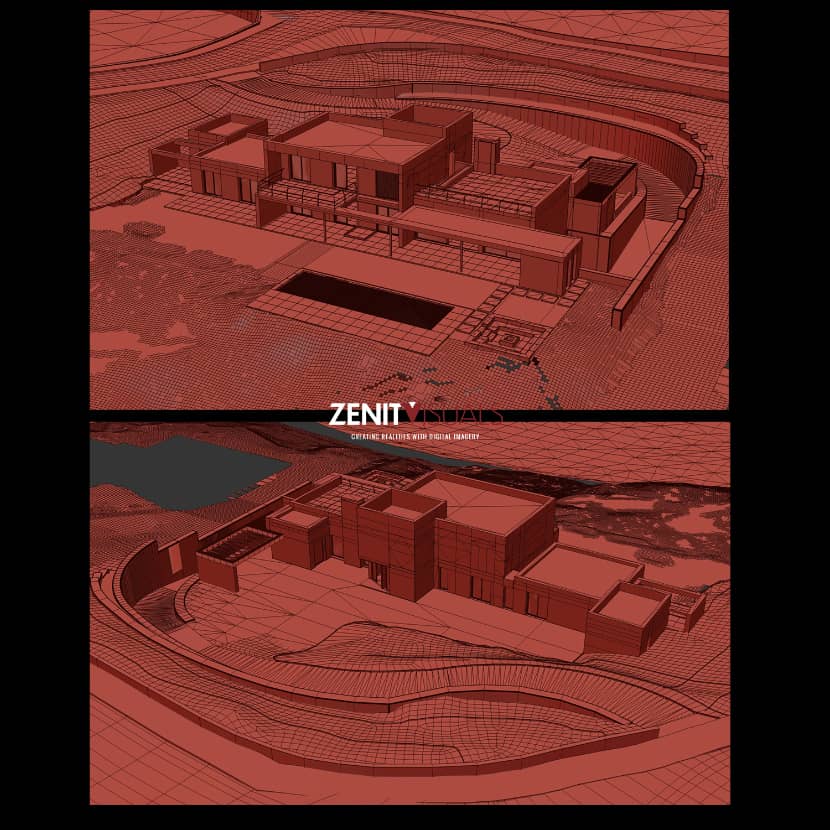
We were provided with a previous 3D model made in SketchUp and the corresponding CAD plans. Usually, architectural modeling is “basic,” especially compared to other 3D environments such as modeling furniture, advertising products, video games, etc. With average skills, you can carry out most of the architectures of this type of promotion.
With the base of the SketchUp model, we proceeded to “clean” and “optimize” the geometry using simple native 3dsMax modifiers such as edit poly, chamfer, etc… in addition to the intensive use of useful scripts such as floor generator.
TIP01. At this point, I want to provide you with my first piece of advice. For exterior renders, do not waste much time modeling the architecture and try to optimize the loading of polygons as much as possible. These images, as I said in the previous section, will normally be made up of the environment (to a large extent) and the villa, with the latter appearing in a small/medium percentage of the image; therefore, it does not require excessive modeling. There are times when, for example, we have downloaded or modeled some fantastic windows or doors in great detail, and then we have to place the camera 20-30 meters from the facade, a distance in which only several rectangular polygons are seen that act as a frame and glass.
For us, this first phase is the one that takes up the least time: creating a model without architectural excesses, faithful to the plans or the model provided by the client.
Lighting & Environment.
We enter one of the key sections to achieve the photorealistic look we are looking for: the lighting and, consequently, and almost even more relevant, the shadows generated with its interaction with the environment. The lights and shadows will generate our volumes, and accentuating these volumes of the architecture will make the image look spectacular.
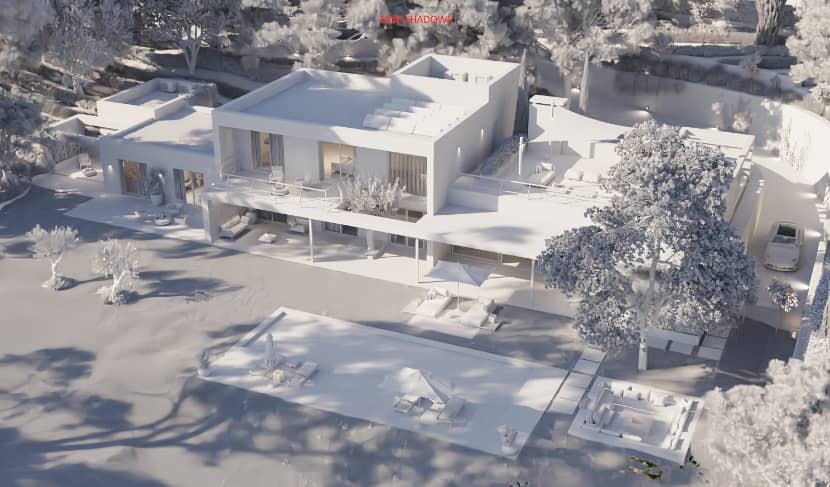
I consider it fundamental and completely linked to lighting, vegetation, and landscaping, so I unify it in this section. A very basic architectural model accompanied by a great job of landscaping vegetation, with quality models well managed with Chaos Scatter or Itoo Forest, can end up in a photorealistic image, while the best architectural model together with a poor treatment of the vegetation and the surroundings, will probably ruin the final image.
TIP02. I now present the second step of our workflow. At ZenitVisuals, we have prepared a base.max file in which we have configured the lighting and vegetation forests that meet the requirements we set out in the first section, and after many years of trial and error, we know that they work in almost any scenario. In this base file, we have the forests, the lighting with Corona Sun or HDRs, and the Corona Lightmix, which are already configured.
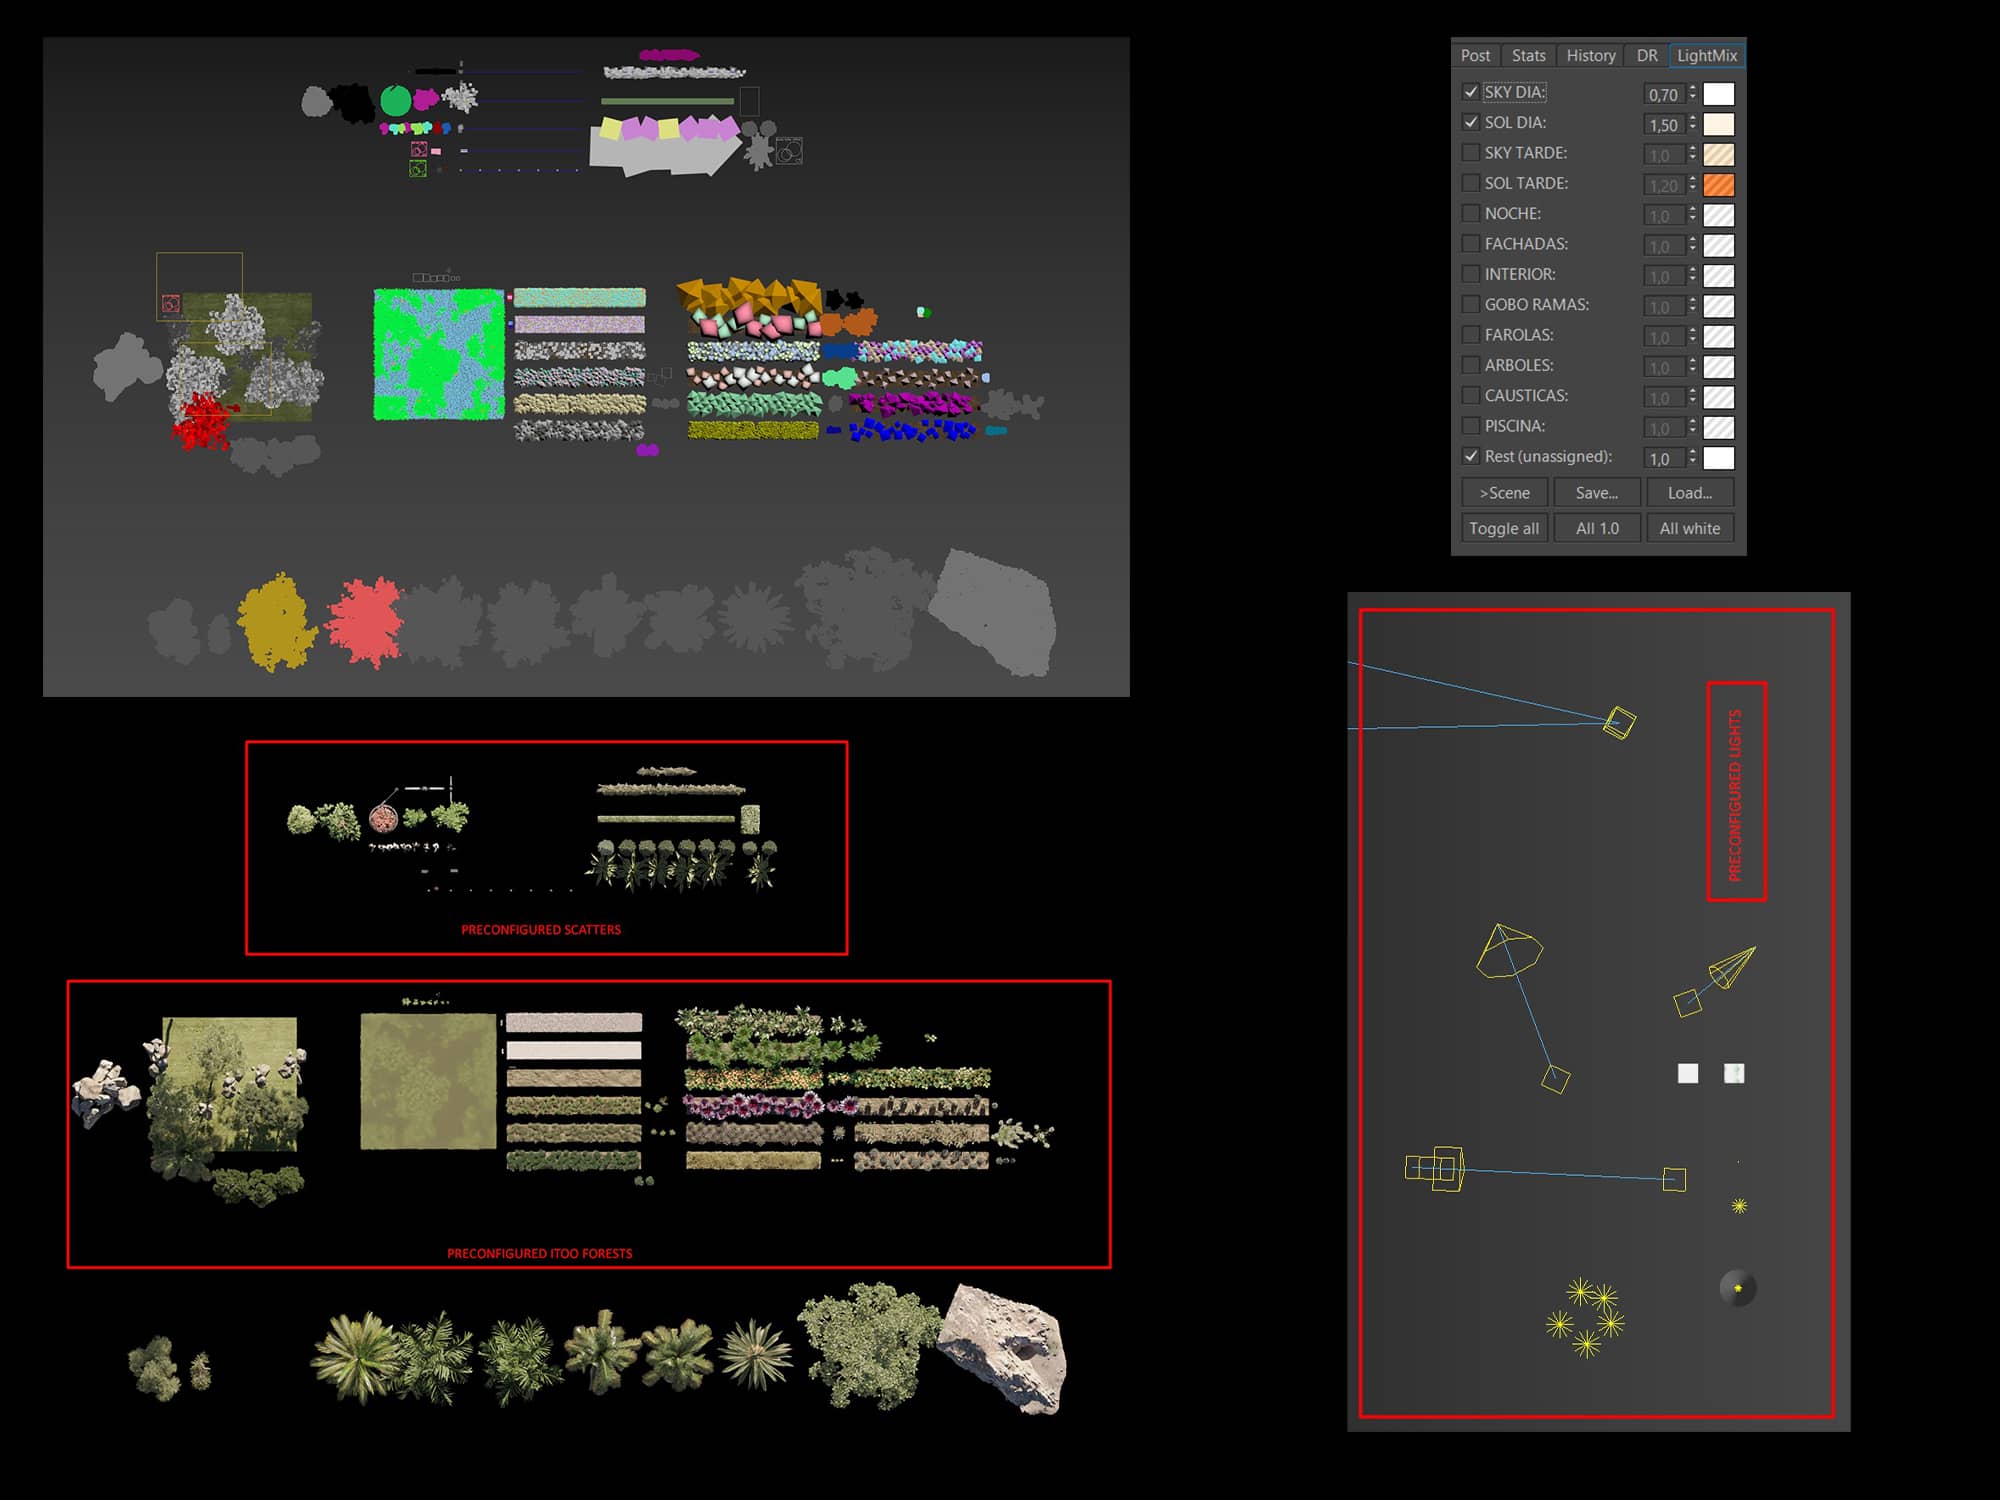
We insert our model into this base file, add the model surfaces to the already preconfigured forests of grass, bushes, decorative stones, leaves, hedges, background trees, foreground trees, etc., and we start “playing” in the corona frame buffer with the most correct direction of the sun.
For the Almenara villa, the lighting used in the final images is generated by a corona sun and a corona sky already preconfigured in the Lightmix of the base file.
TIP03. Play with the vegetation to generate shadows, be creative, and don't settle for “reality”. Maybe you have to place a tree outside the camera so that it generates a shadow in the foreground that frames the image, for example, or it is likely that if part of the façade is affected by a shadow, the composition will improve greatly and the volumes will be better differentiated. (you can create a tree “invisible to camera” that generates this effect).
REAL LIGTHING.

FAKE LIGTHING.
TIP04. Even if it is not visible on camera, try to generate vegetation around your villa, especially behind the position of your camera, as this will affect the reflections generated and help achieve the look we are looking for.
Composition.
The rule of thirds and the golden spiral are our main composition guides.
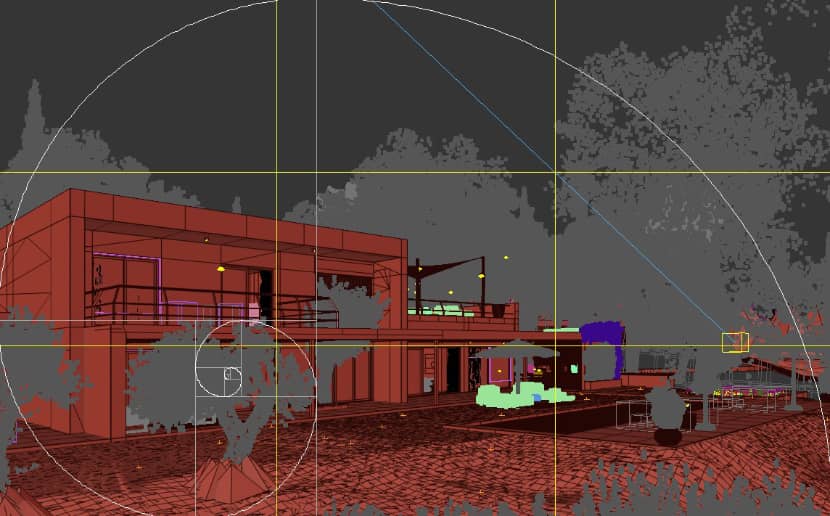
TIP05. Use vegetation to “frame” your images. Direct your viewer's eye towards the architecture by creating less exposed vegetation elements in the foreground, with darker colors that generate “natural frames”.
TIP06. Use the animation frames as if they were 3dsmax scene states. We have not had good experiences with these scene states, but we have a good ally in the animation frames. Many times, we find ourselves in the need to “move” some element from one camera to the next, especially a tree that is in the middle of the camera's view, a bush that would be great for us to be in the foreground, etc. …Be creative and do not settle for the “reality” of your project, look for frames and compositions with elements that, in the beginning, do not exist. We generate a frame for each camera, frame 01 corresponds to coronacam01, frame02 with coronacam02, etc... and from one frame to the next, we can generate the “movements” of elements that we need.
IMAGE OF THE REAL MODEL.
(Frame 01 with the geometry in its correct place)
FAKE IMAGE OF THE MODEL.
(Frame 02 with the geometry displaced looking for framing and composition)
Materials.
Nowadays I think that the issue of materials has been greatly simplified to how we composed a shader several years ago. I am very much in favor of very simple materials in terms of nodes in the material editor with good-quality textures. For these outdoor projects, 2k/4k textures are totally valid since, I insist, the architecture will be seen from a certain distance.
For villa Almenara we used shaders from Megascans and Corona's own materials base. It must be taken that, as I mentioned in the first section of the article, the materials for this type of project are very specific and we have them very refined. This leads us to the fact that these are shaders that we know work perfectly with the lighting of the base file and that we do not have to configure afterward with the consequent loss of time.
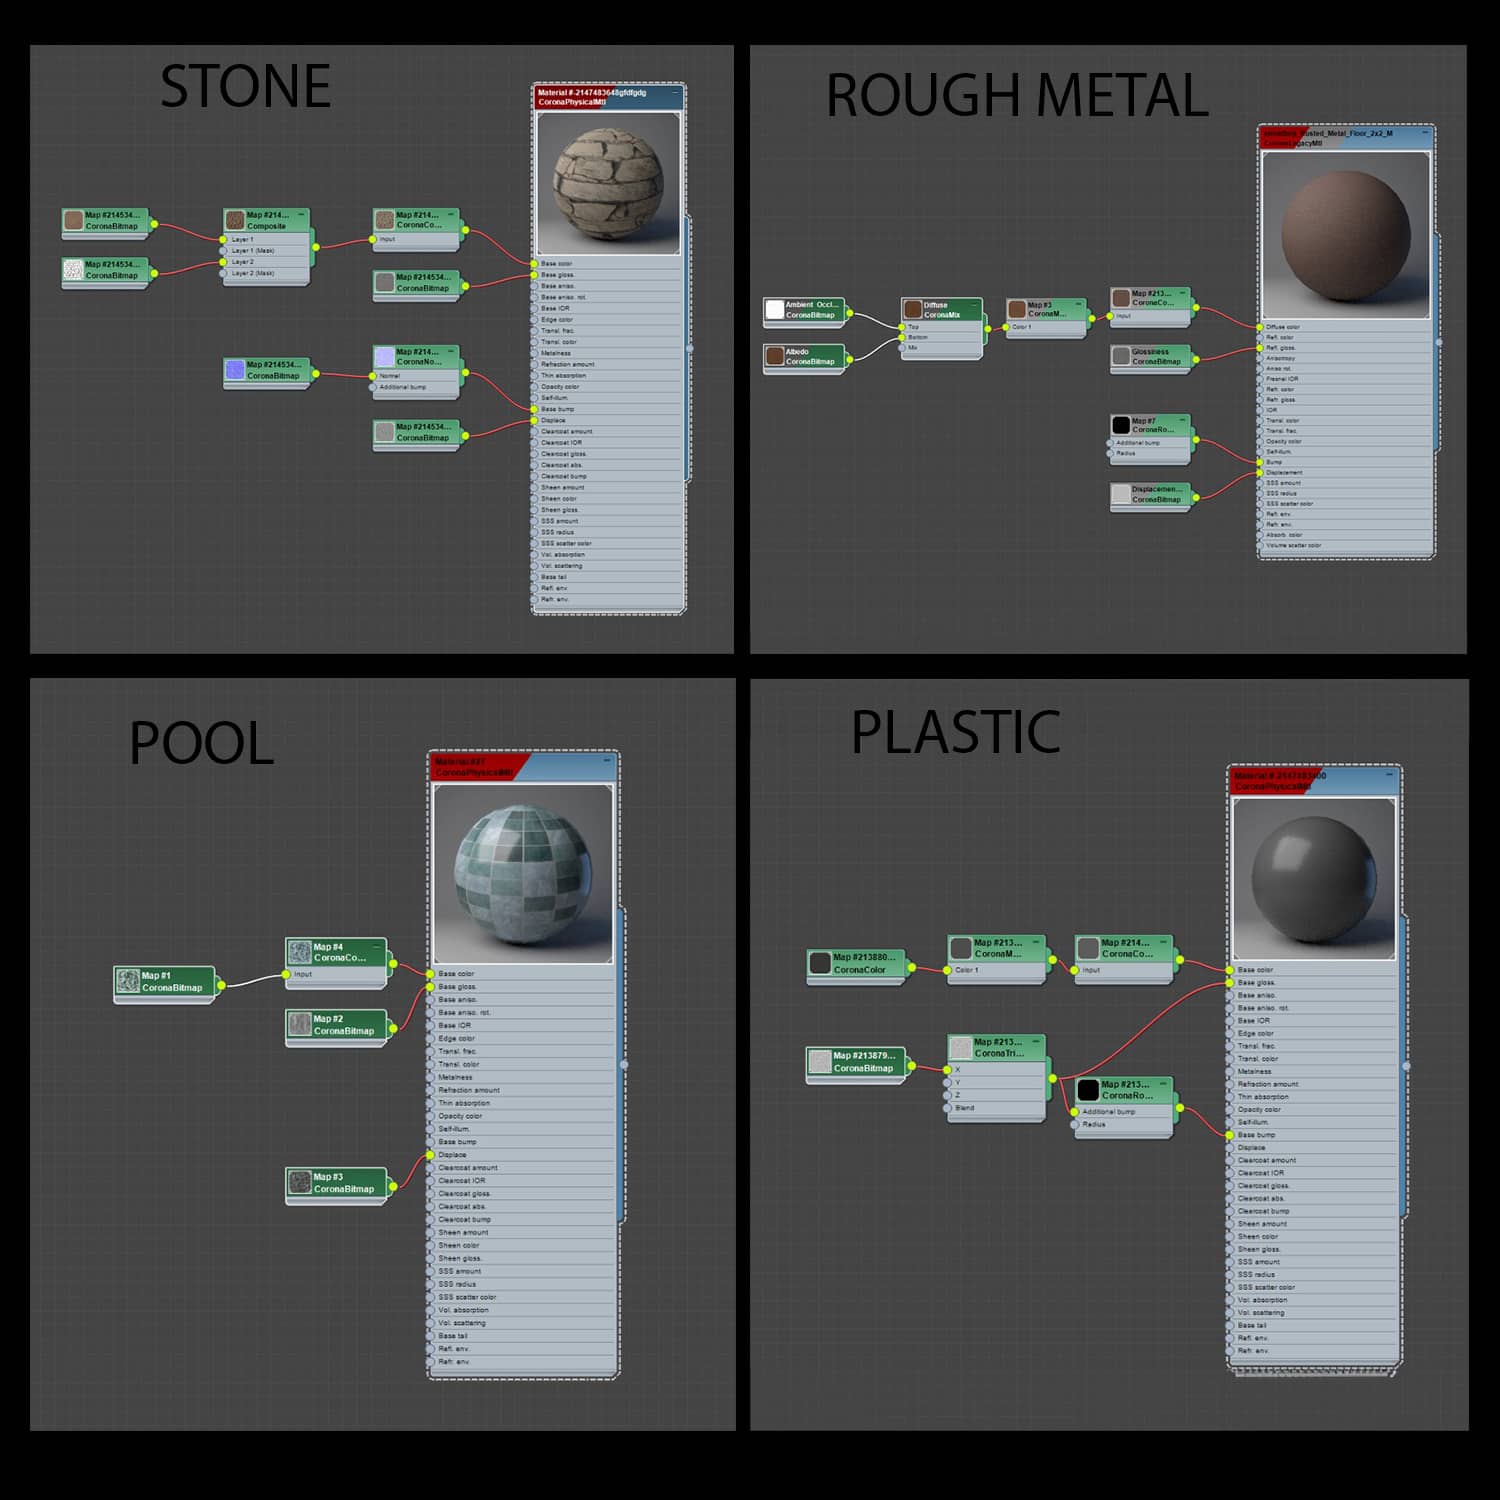
TIP07. For this type of exterior render, do not spend much time looking for the “perfect” material, generating very complex materials in terms of nodes in the editor material. Create a basic material with quality textures and add some noise to break its homogeneity. In post-production, with the help of current AI tools, you can quickly add imperfections using masks.
Post-Production.
The post-production process is very basic. We use Photoshop to modify exposures, saturations, intensities, etc. In the studio, we try to ensure that the RAW output of the rendering engine is 90% of the total final image and post-production retouching is minimal.
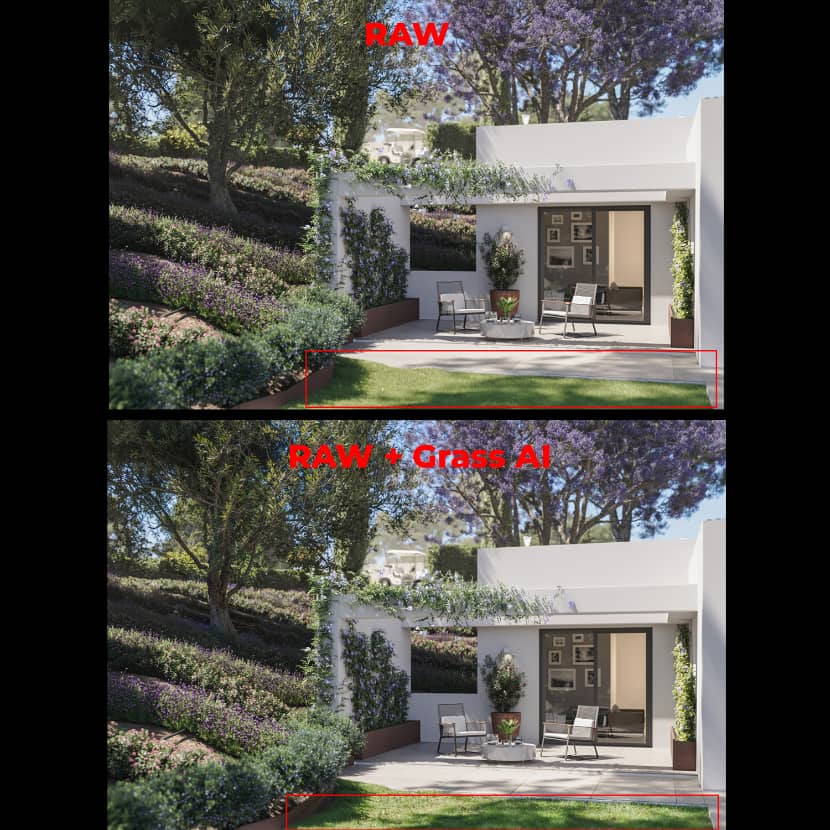
Something I want to emphasize in this section is the integration that we are doing with AI tools that improve the final look of the image and save us a lot of time if we want to achieve the same result with Corona shaders.
Below is an example of how the grass looks in the output image of the rendering engine and how it improves substantially when, through masks, we use tools such as MagnificAI or LeonardoAI. As you will see, we can obtain the final result of the grass by playing with the forests dedicated to it and their textures, but it is much more comfortable and faster to create a “basic” grass and then perform an enhancement with AI.
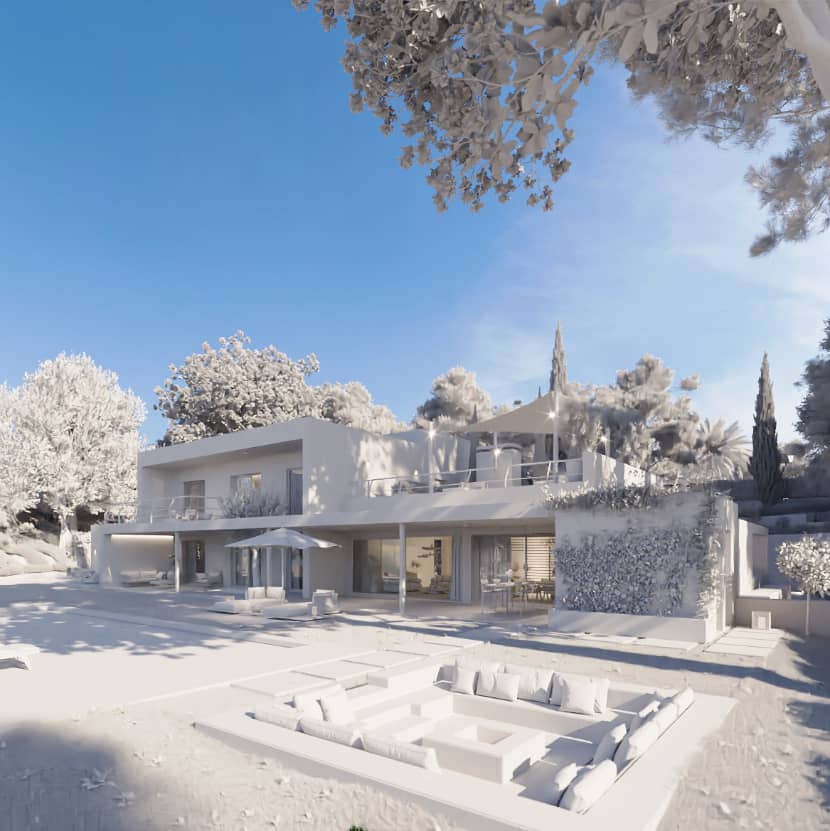
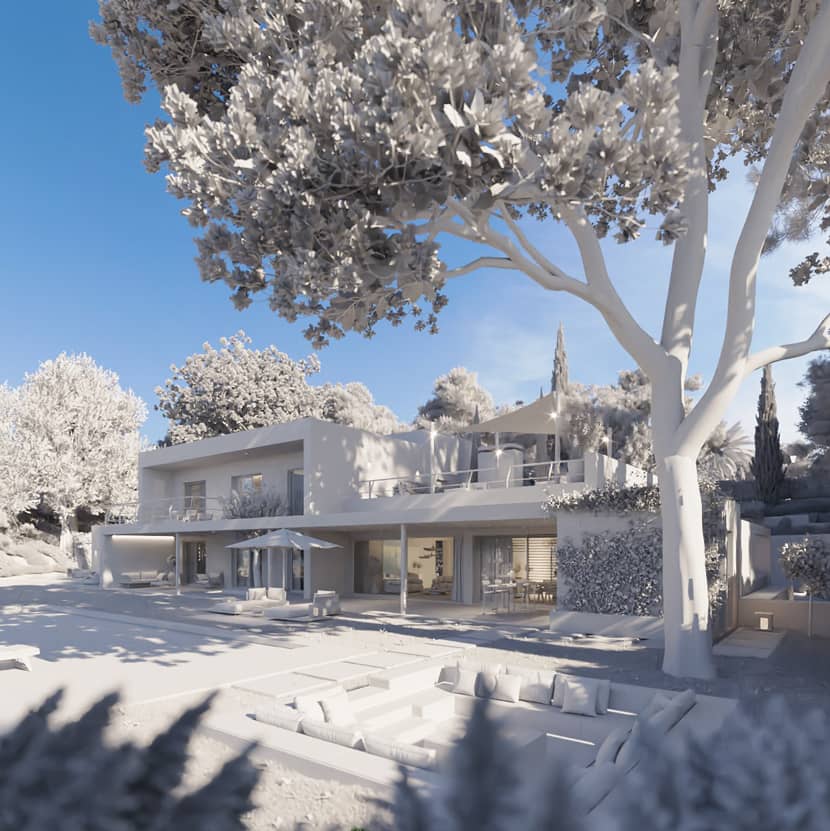
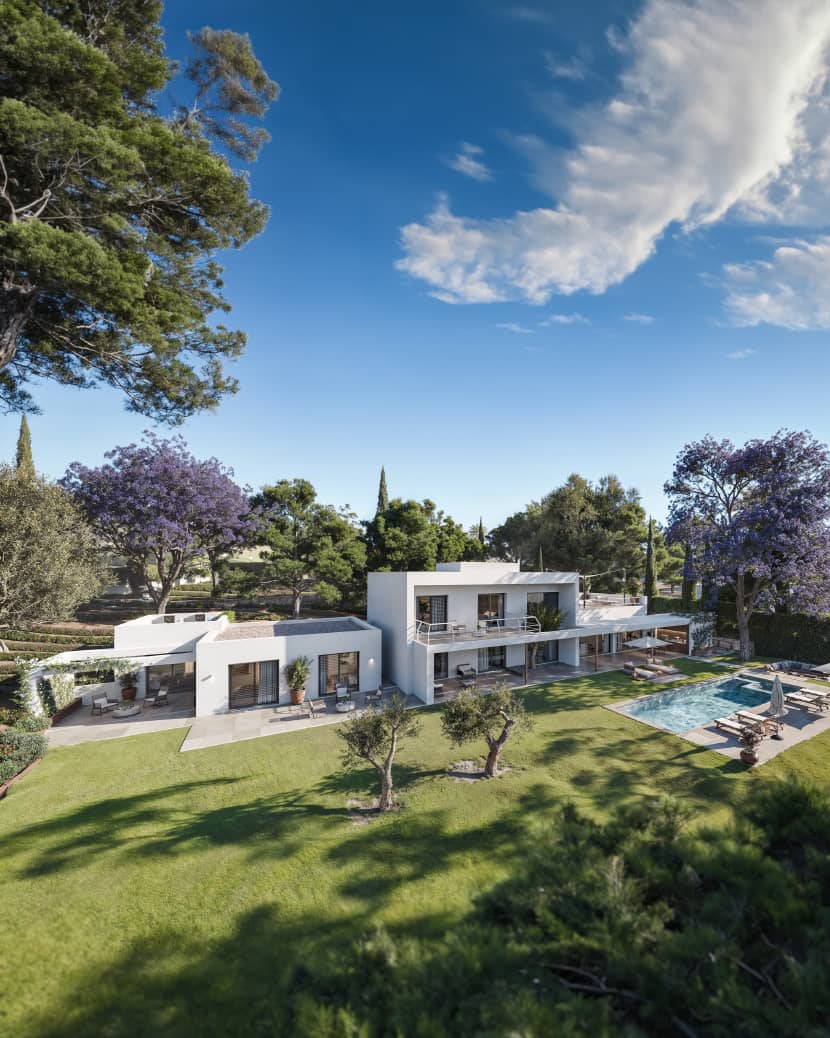
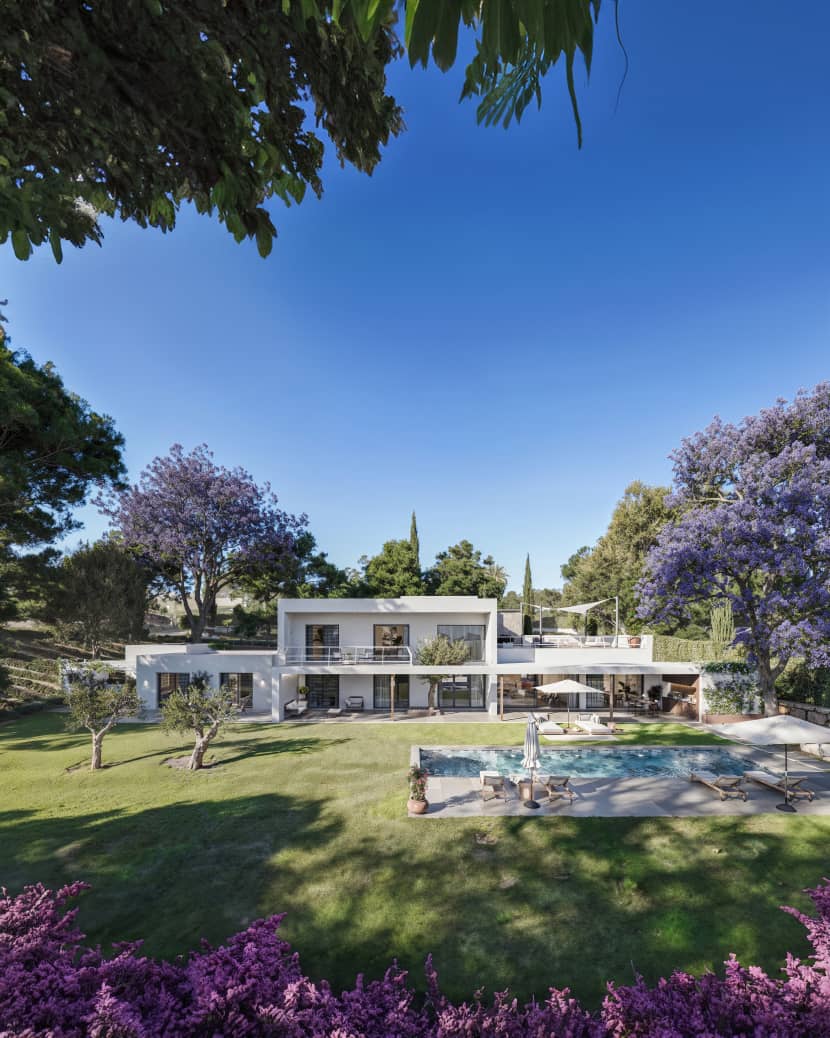
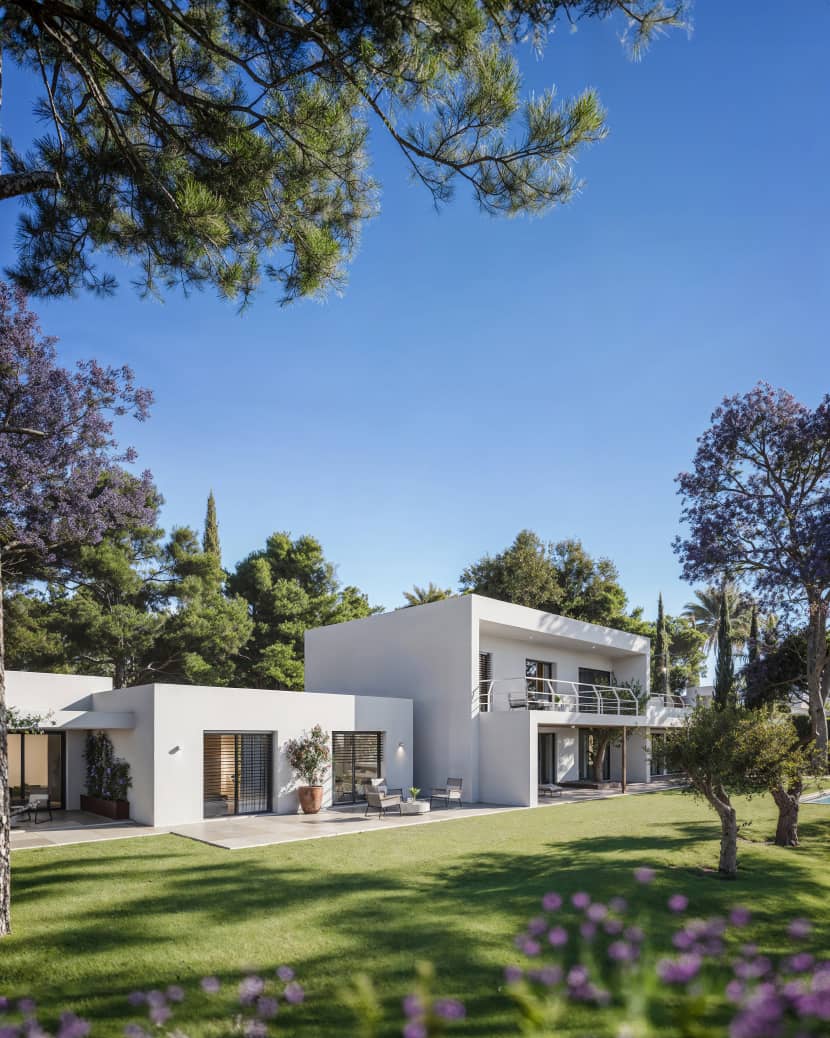
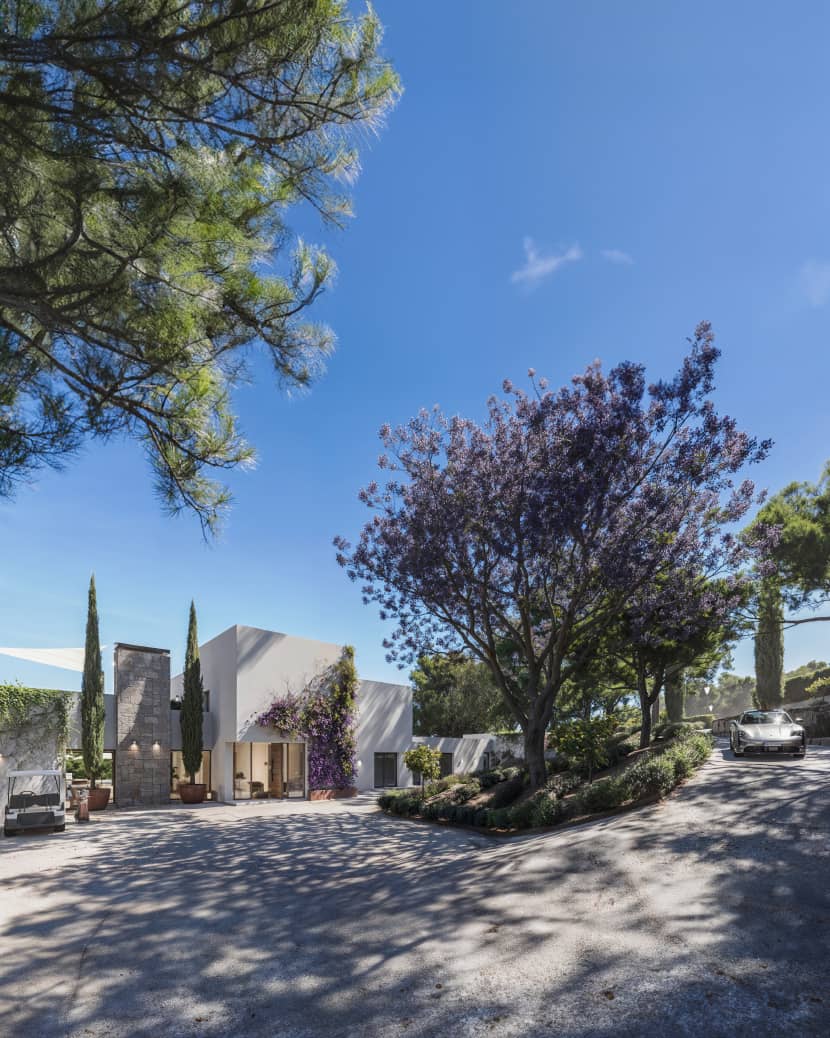
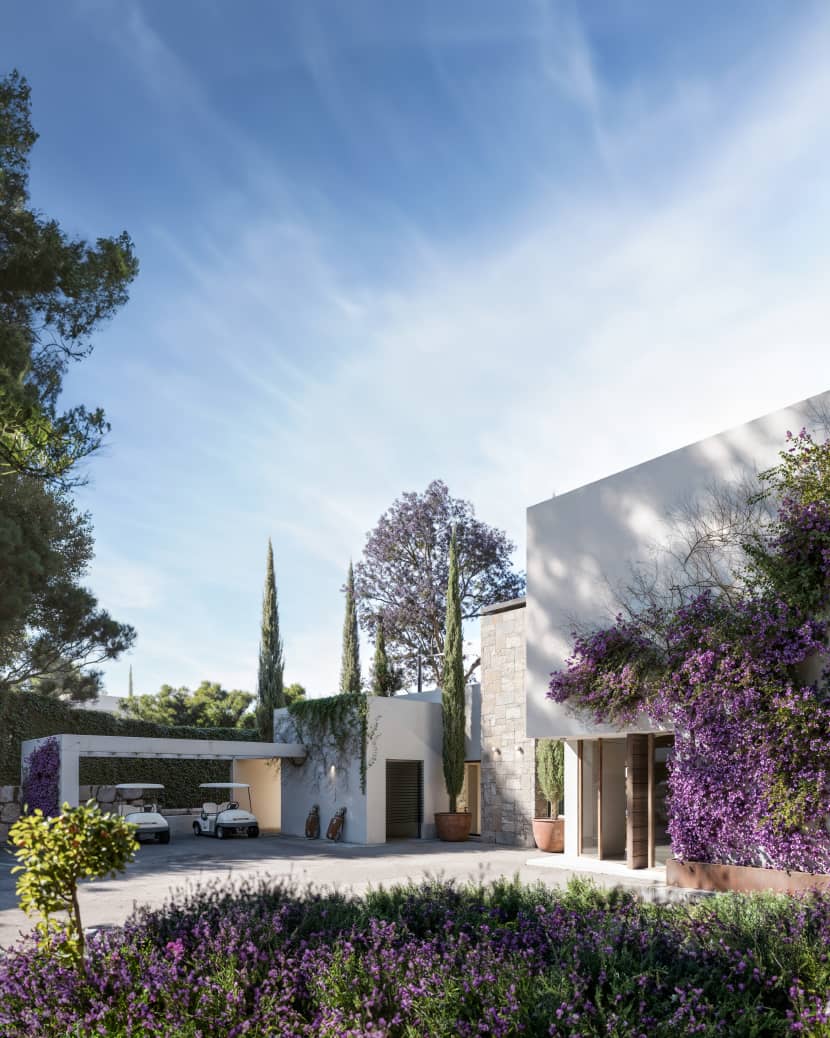
Final Images.
Below are all the final images for the "Villa In Sotogrande" project.

I take this opportunity to thank REBUSFARM and VWARTCLUB for giving me the space to share with everyone part of the knowledge that I have acquired over time and to be able to help all those who are starting out in this exciting world.
There are many topics and tips that are left out of the article that I would be happy to share, so I am providing you with my contact information and those of the studio in case you want to delve into some of the topics discussed.
Kind regards,
Jose Zorrilla.
About the artist
Jose Zorrilla is a senior artist and the current manager of the architectural visualization studio ZenitVisuals, located in Malaga, Spain. Although he is a civil engineer and practiced his profession for many years, he dedicated all his free time to his true passion: the 3D world, architectural visualization, photography, and related fields.
In 2014, he decided to leave his primary job and embark on a new professional path, which has led him to his current position at ZenitVisuals.
![]()
![]()
![]()
![]()
![]()